Configure the SAP Cloud Platform connector in Bizagi
Overview
Bizagi can be integrated with the SAP Cloud Platform using an out-of-the-box connector. This article explains how can you configure the SAP Cloud Platform connector in a Bizagi Studio project.
Before you start
To configure the connector you must have configured the services and connections in the SAP Cloud Platform. For more information, refer to How to configure SAP Cloud Platform for on-premises systems. From this configuration, you must obtain the Application Route within the Cloud Foundry.
Bizagi has a Proxy configuration option available to connect with external services such as the SAP Cloud platform connector.
Configuration in Bizagi Studio
To set the SAP Cloud Platform connector follow these steps:
-
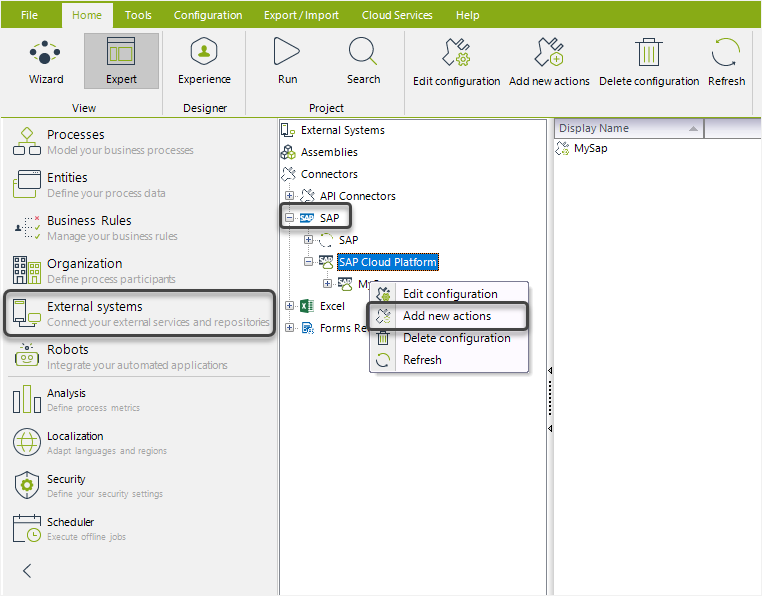
Open the Expert view and select the External Systems module. Then, open the SAP main node, where you find two SAP connectors:
- SAP Connector: R/3 and ECC systems using BAPIs.
- SAP Cloud Platform: SAP Cloud Connector using OData services.
Right-click the SAP Cloud Platform node and select Add new configuration.
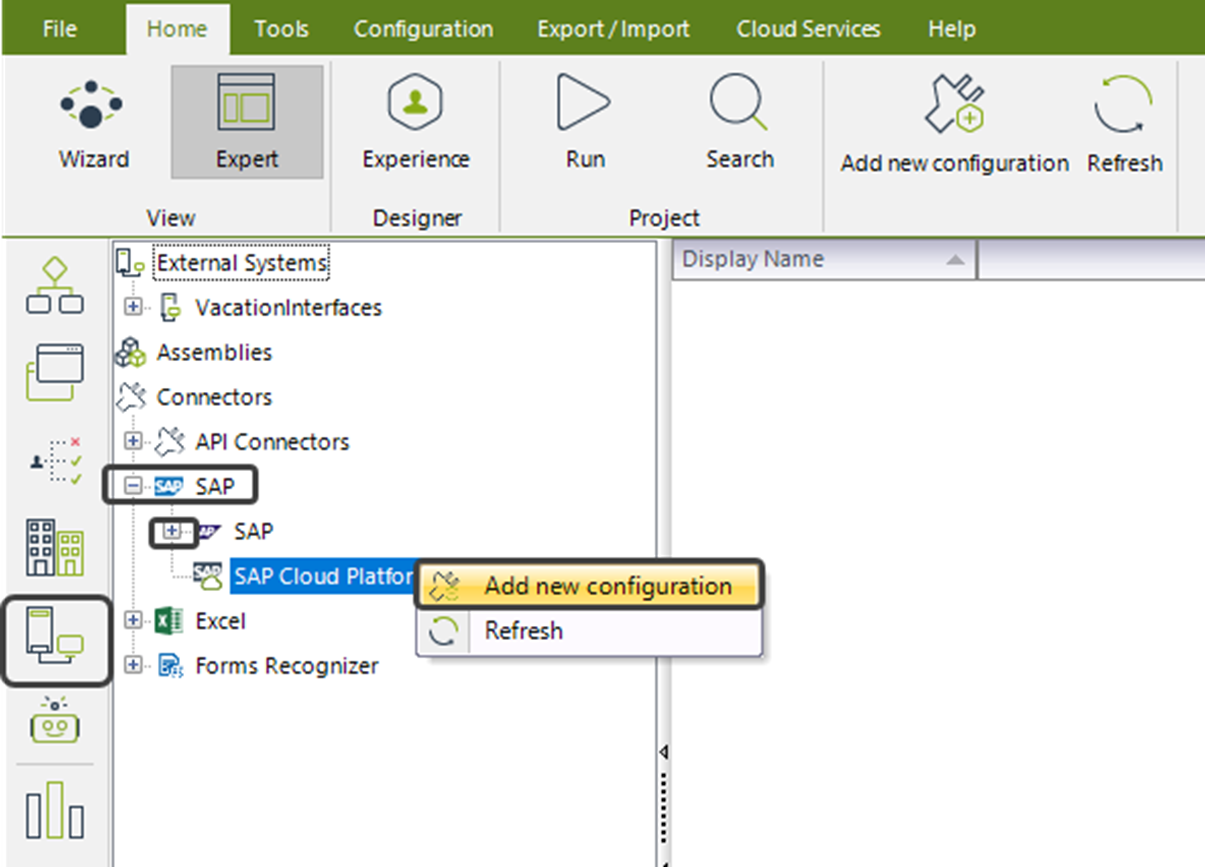
Alternatively, you can set the SAP Cloud Platform connector via the Add new configuration button located on the top ribbon:

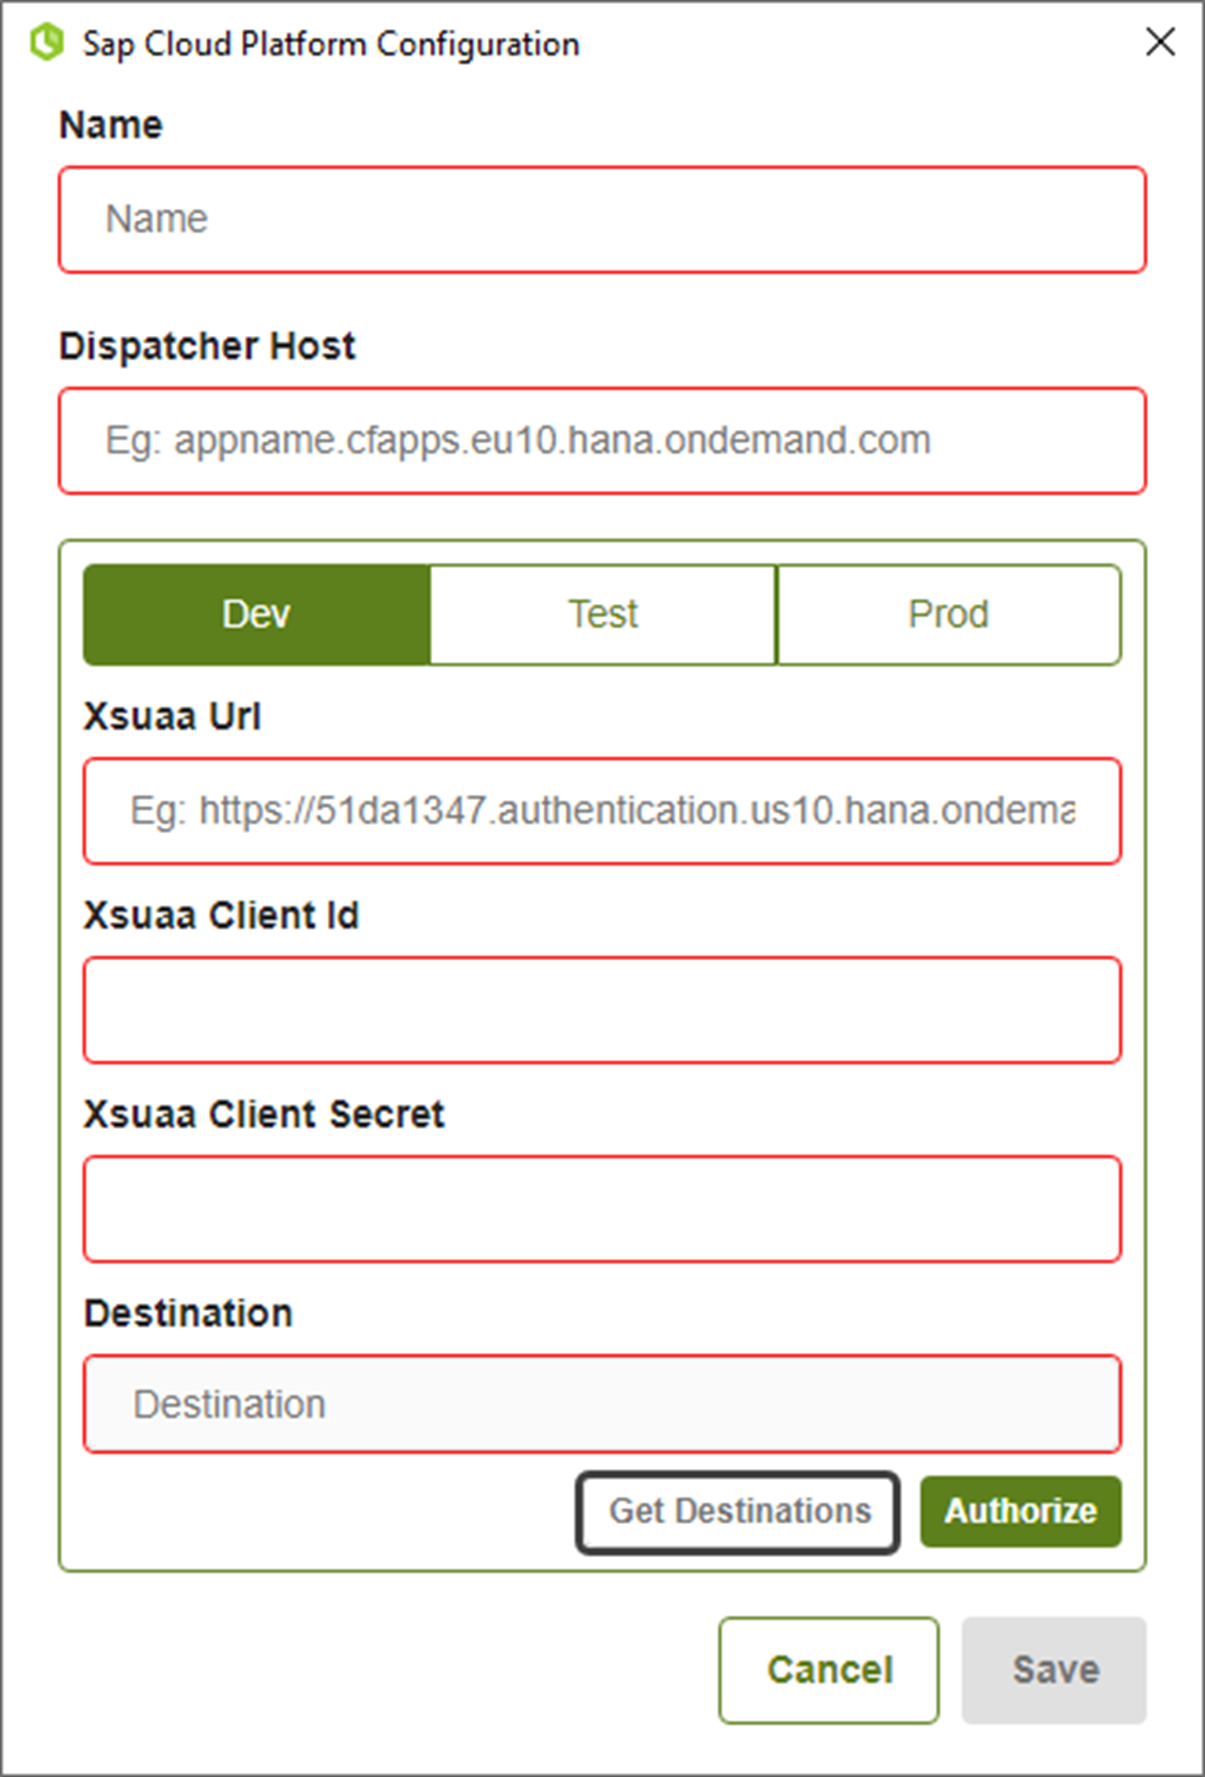
- When loading a new configuration, the following form is displayed:
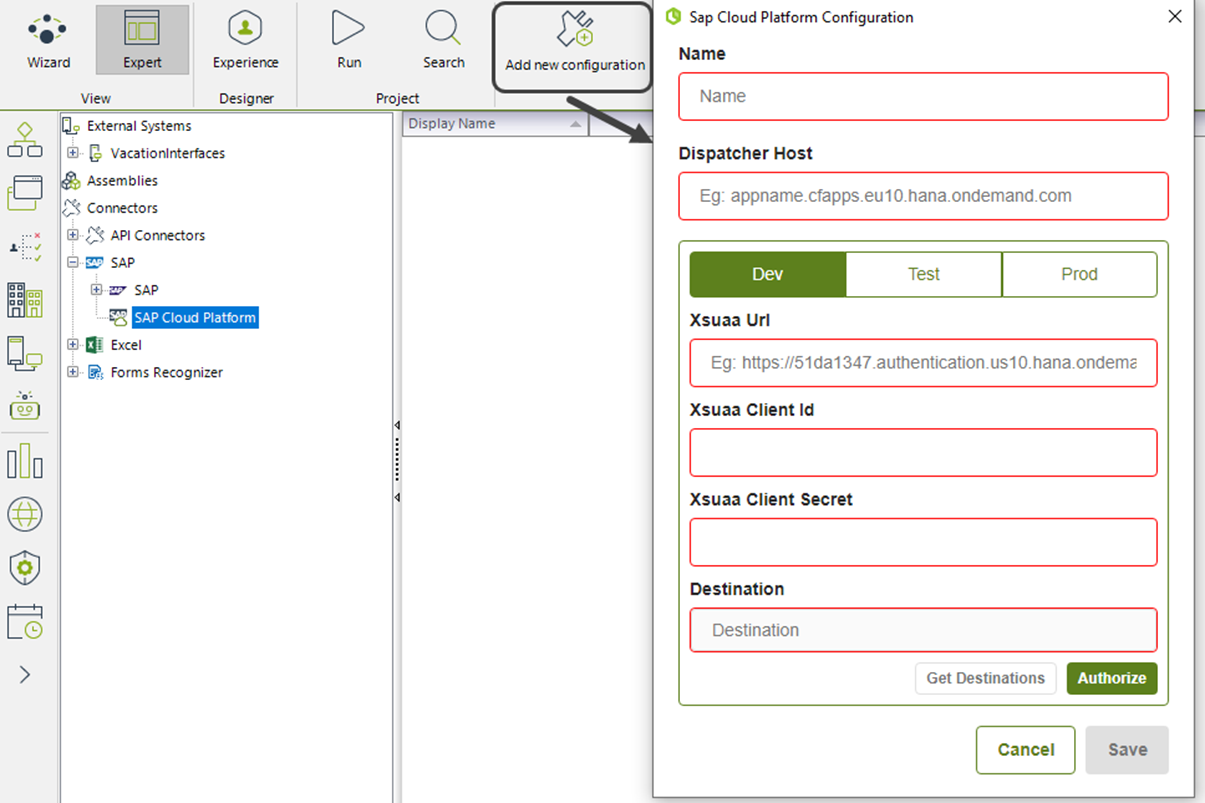
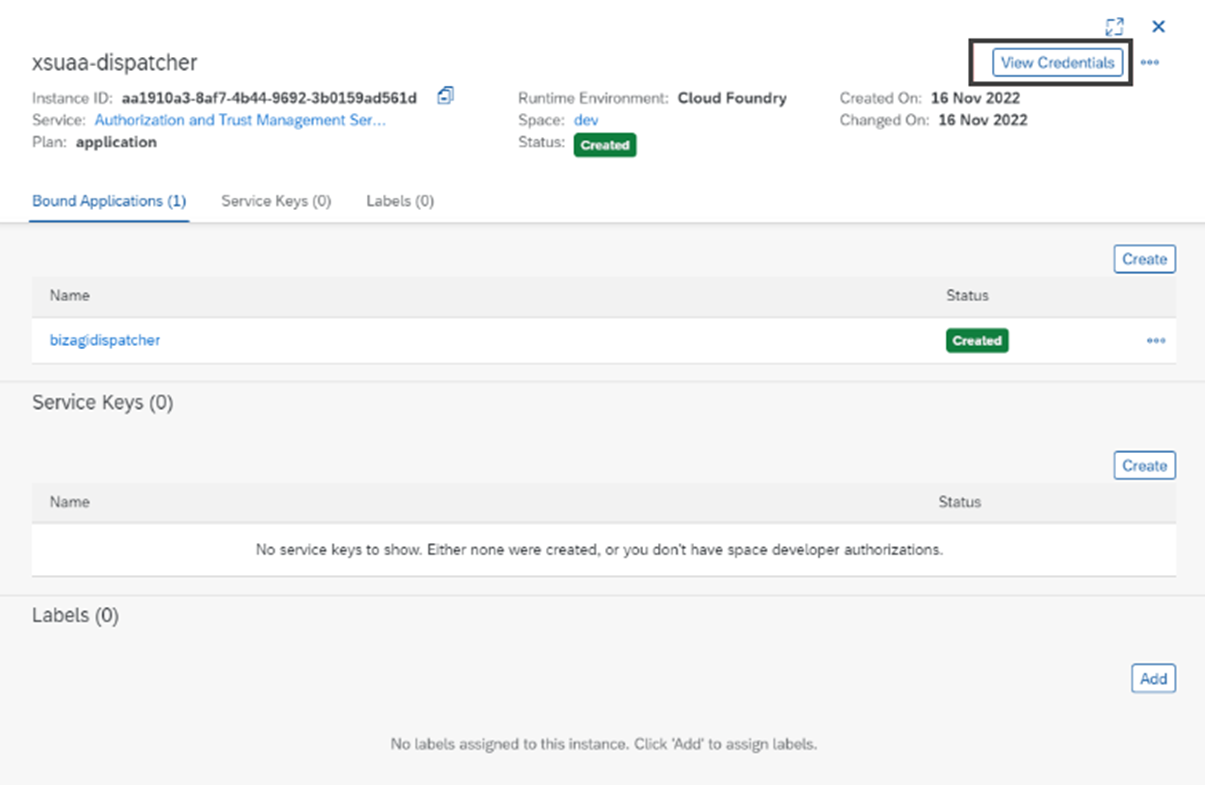
The Xsuaa Url, Xsuaa Client Id and Xsuaa Client Secret data are required for OAuth2 code grant authentication. These can be located within the Business Technology Platform (BTP) in the xsuaa-dispatcher service instance, as shown in the following images:

- The value of the Redirect URI is another input required for OAuth2 code grant authentication. It is not shown on the form and by default is always: https://build.bizagi.com/redirectOauth2.html
- In order to obtain the destinations, the token must be valid or a new one must be generated. The button Get destinations is enabled after the token validation.
- The access token obtained has a default expiration of 12 hours. Bizagi validates the token time and if it has expired, obtains a new token automatically through the Refresh token (which does not expire).
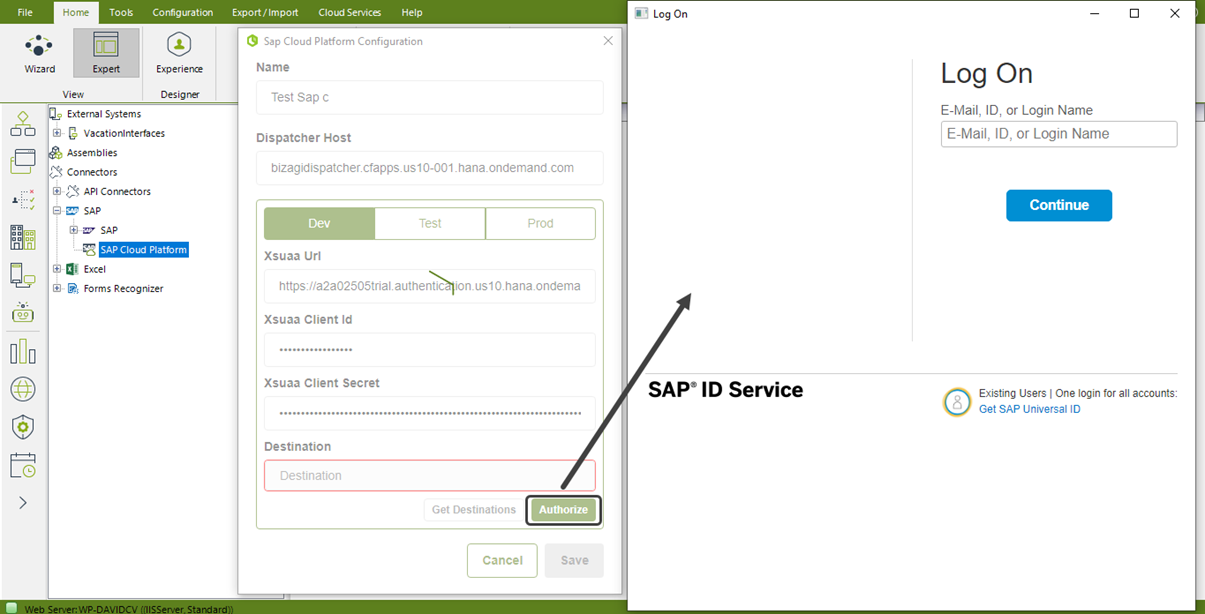
- You must fill in all the required data and then click the Authorize button:
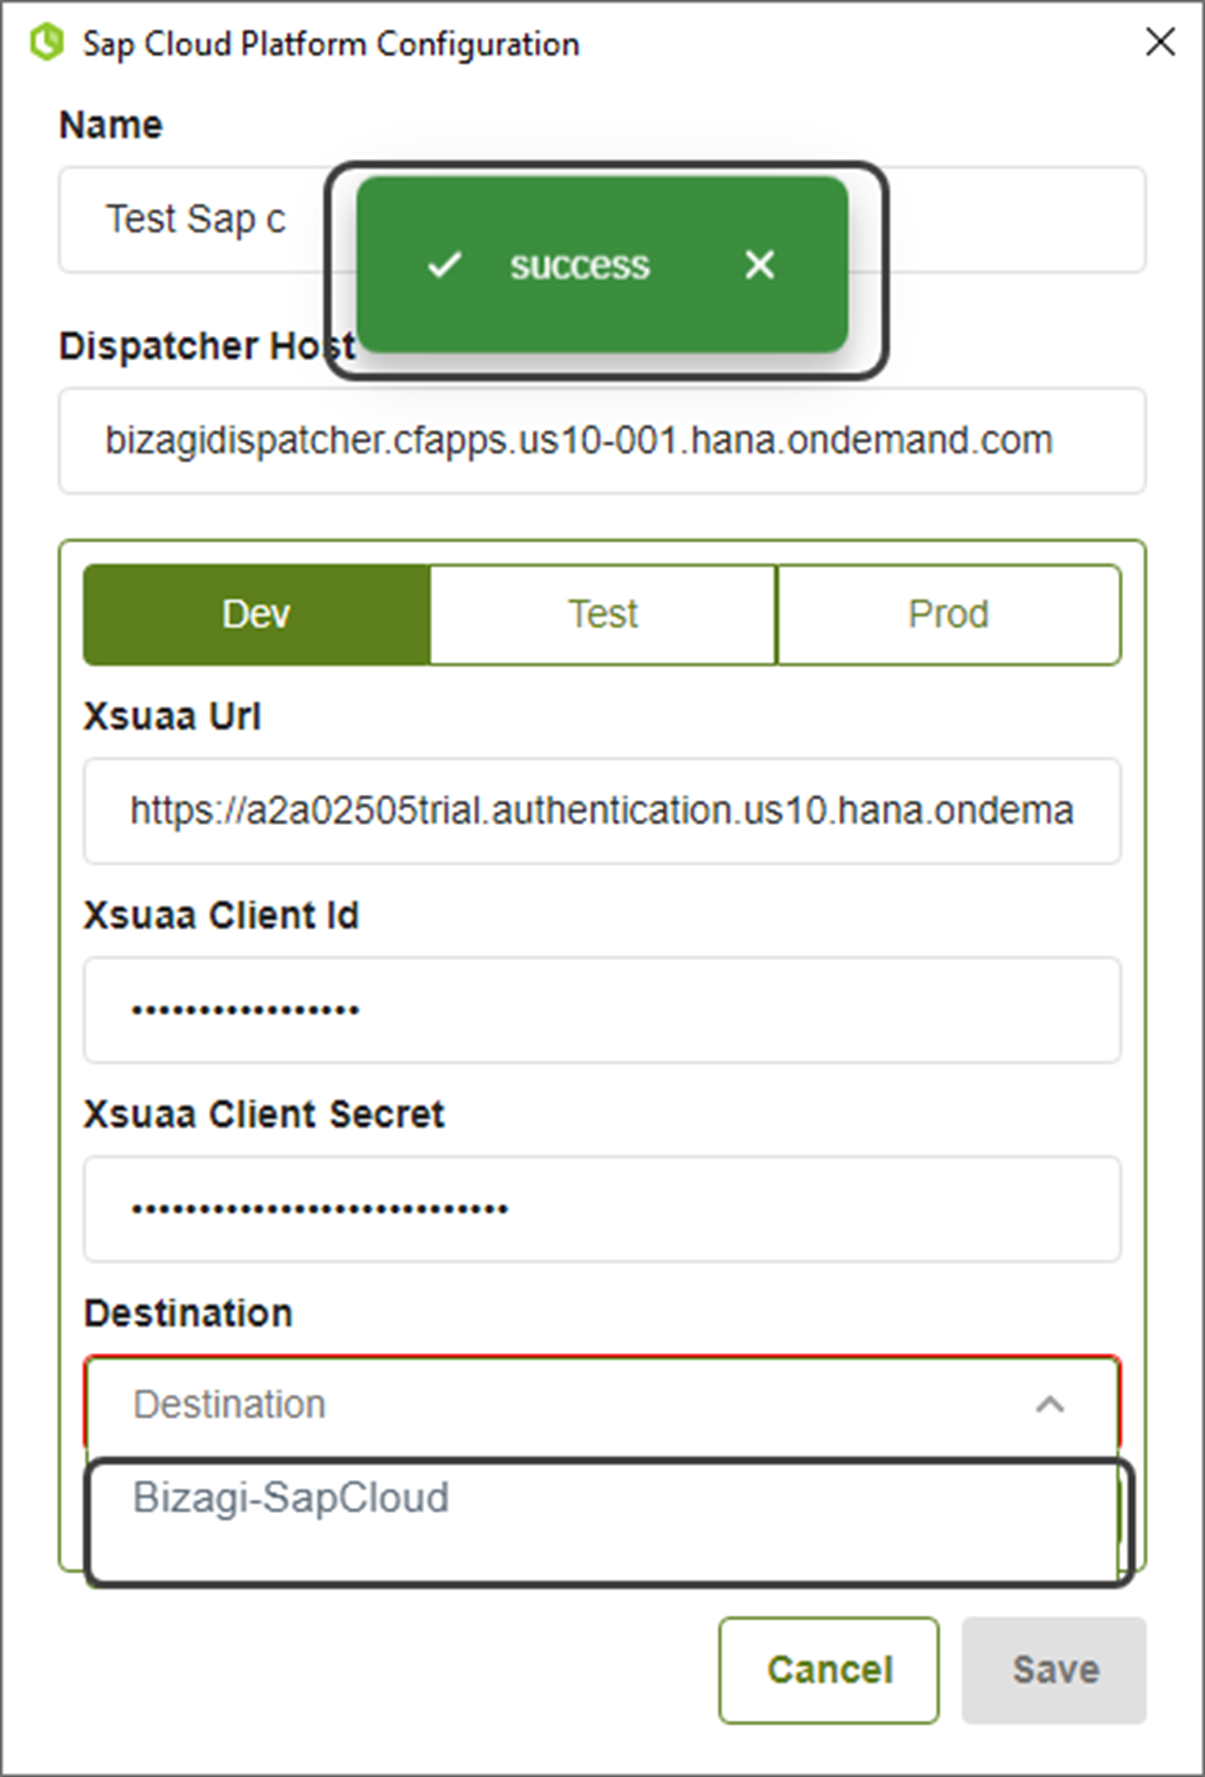
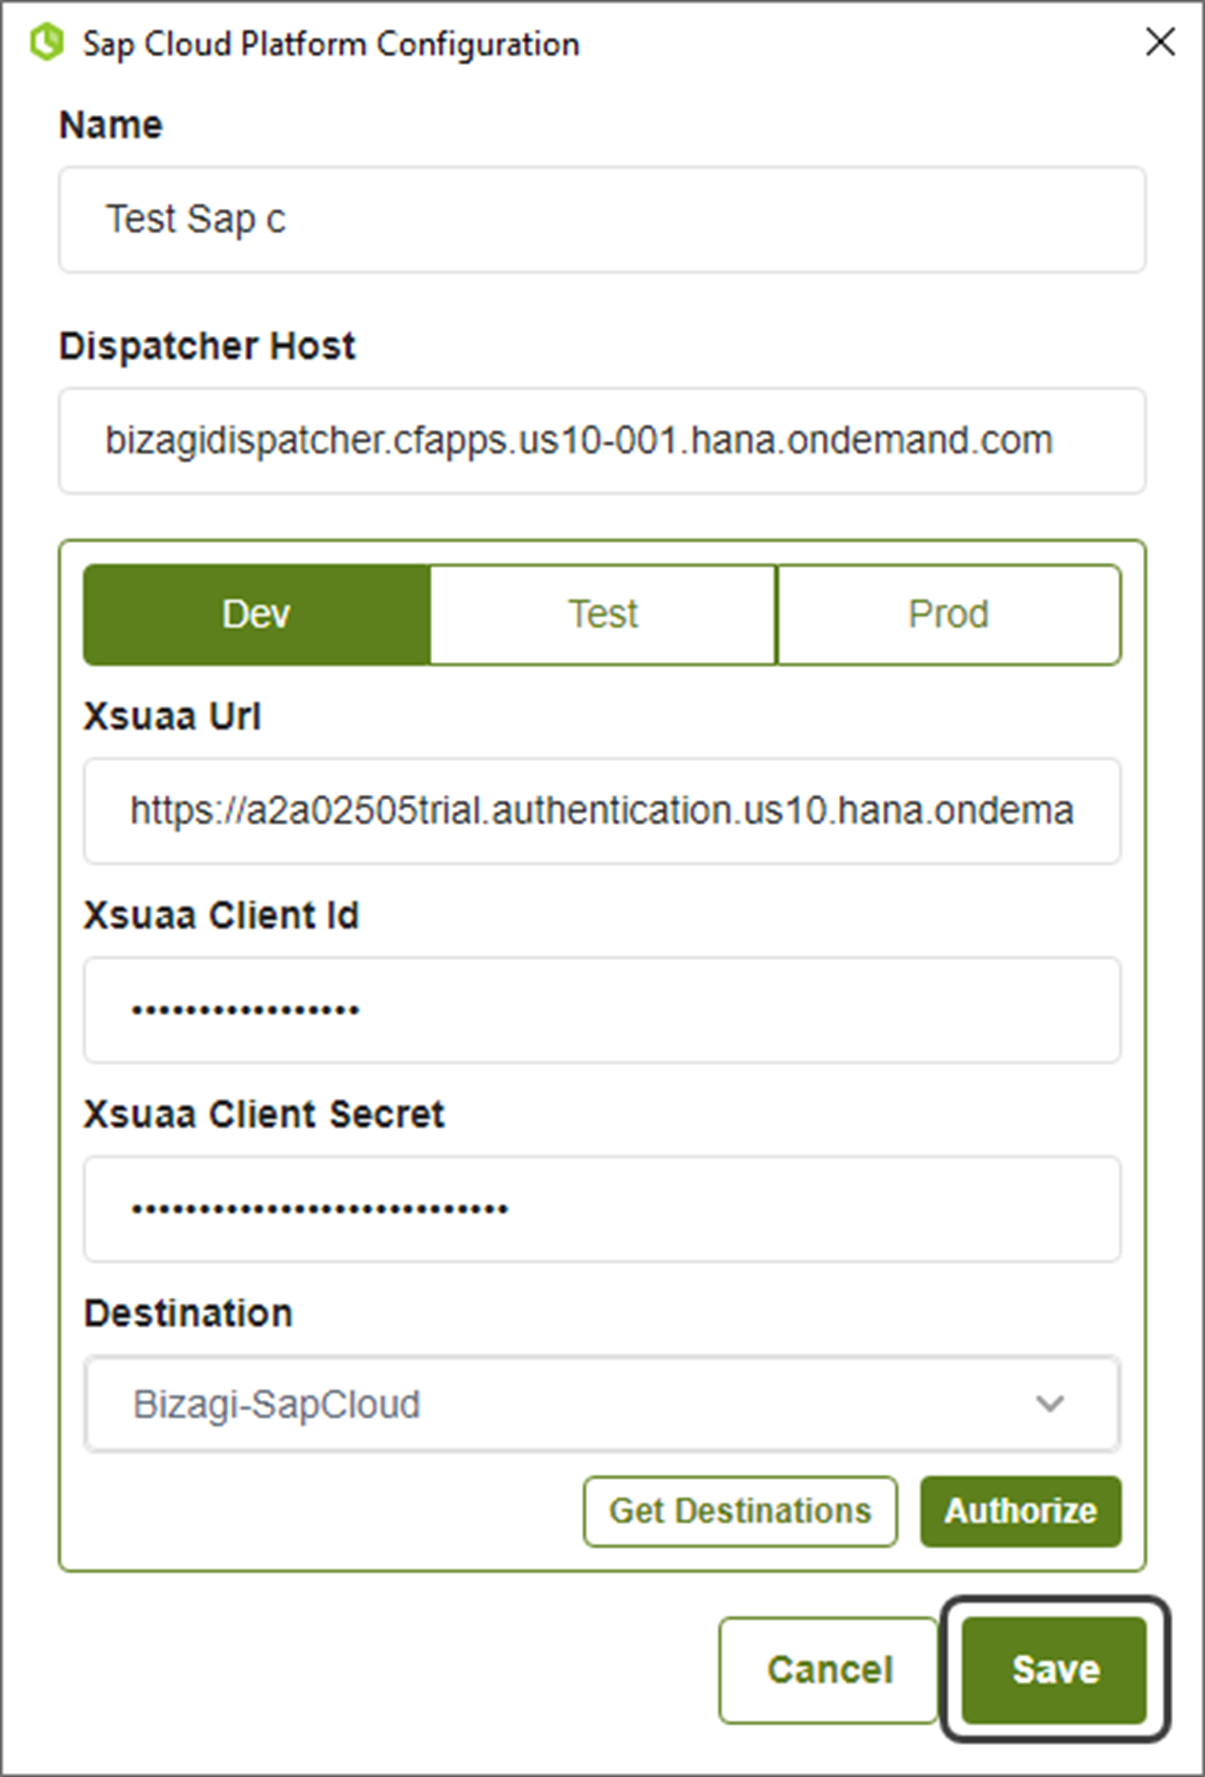
- Once the credentials have been entered, a pop-up window appears indicating that the credentials have been successfully accepted, and the button to Get Destinations is enabled.
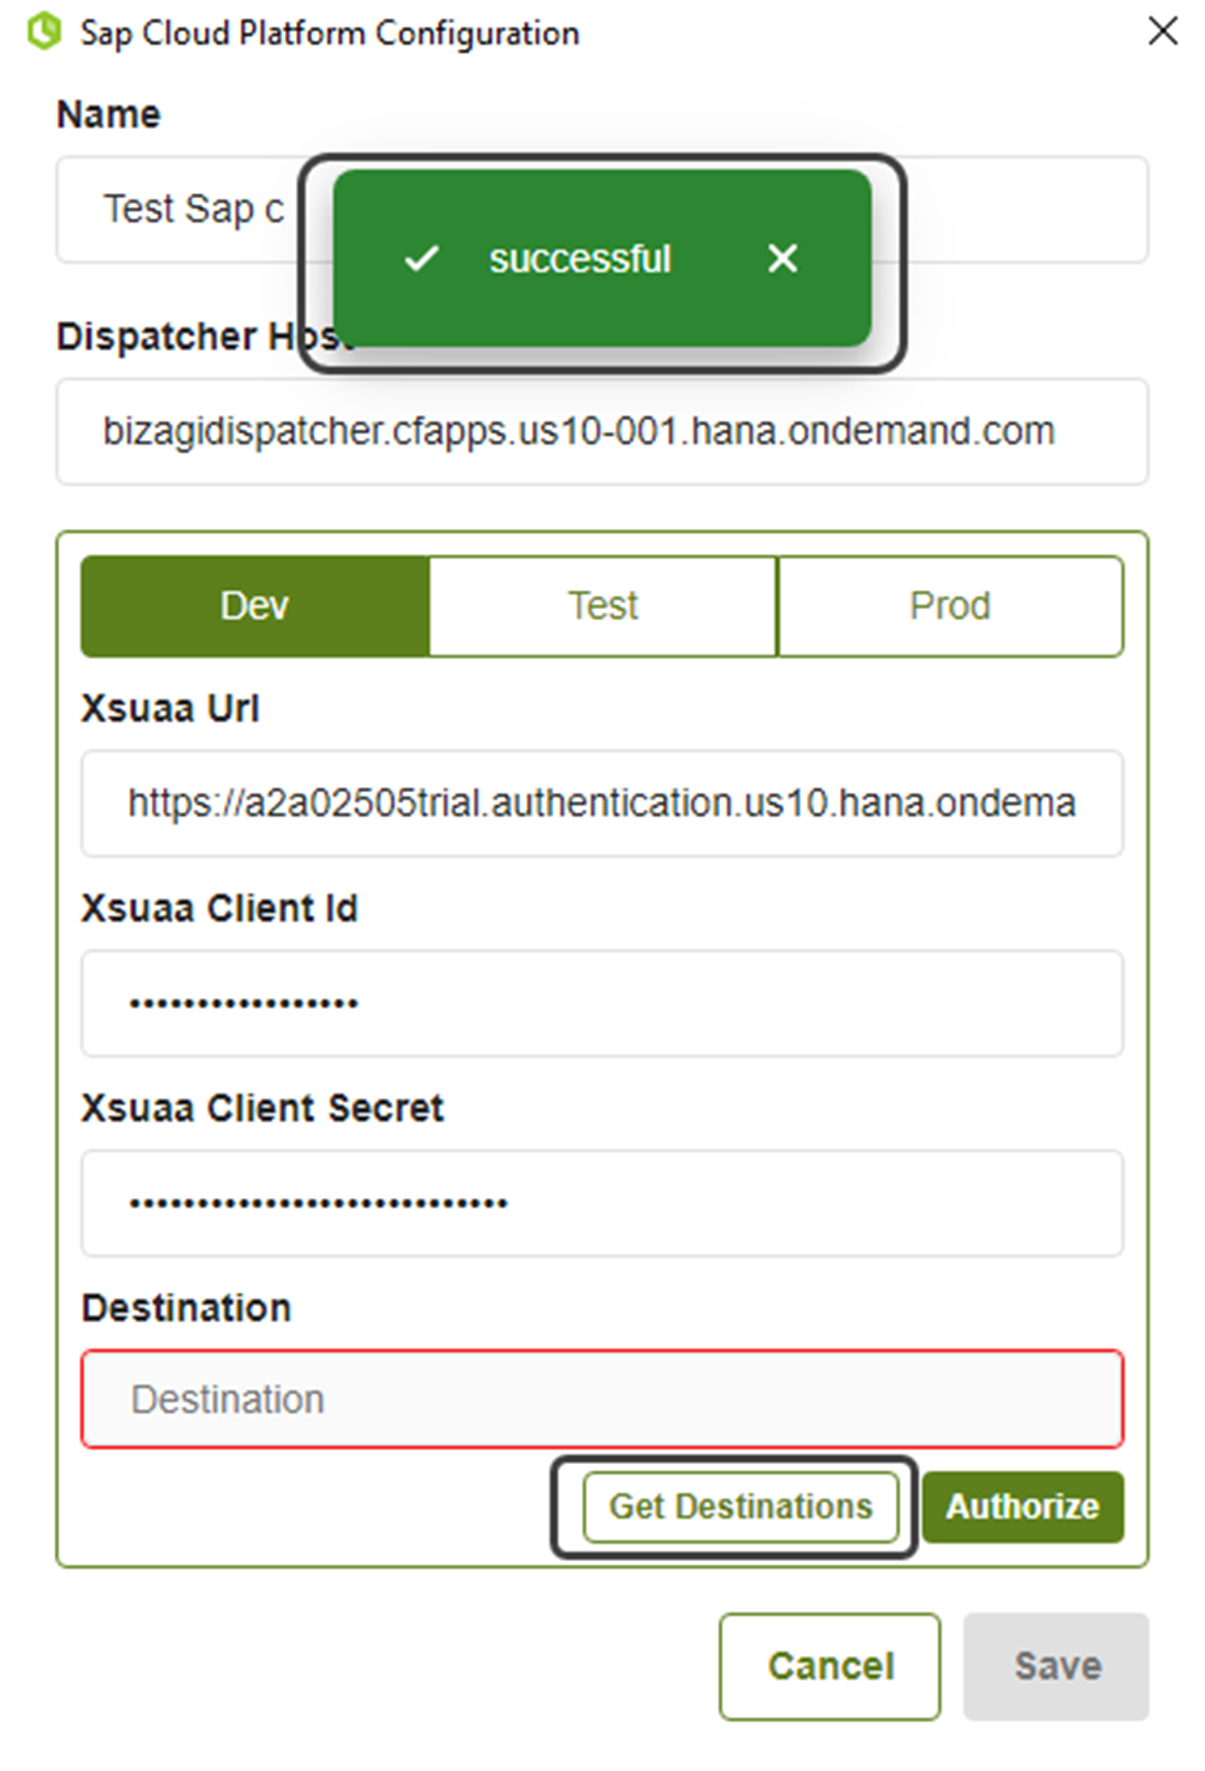
- When you click the Get Destinations button, the list of available destinations is displayed:
- Clicking Save without modifying any data entry fields (except the destinations) closes the SAP Cloud Platform Configuration window:

- To create actions, the token created in the configuration is used:
Validations
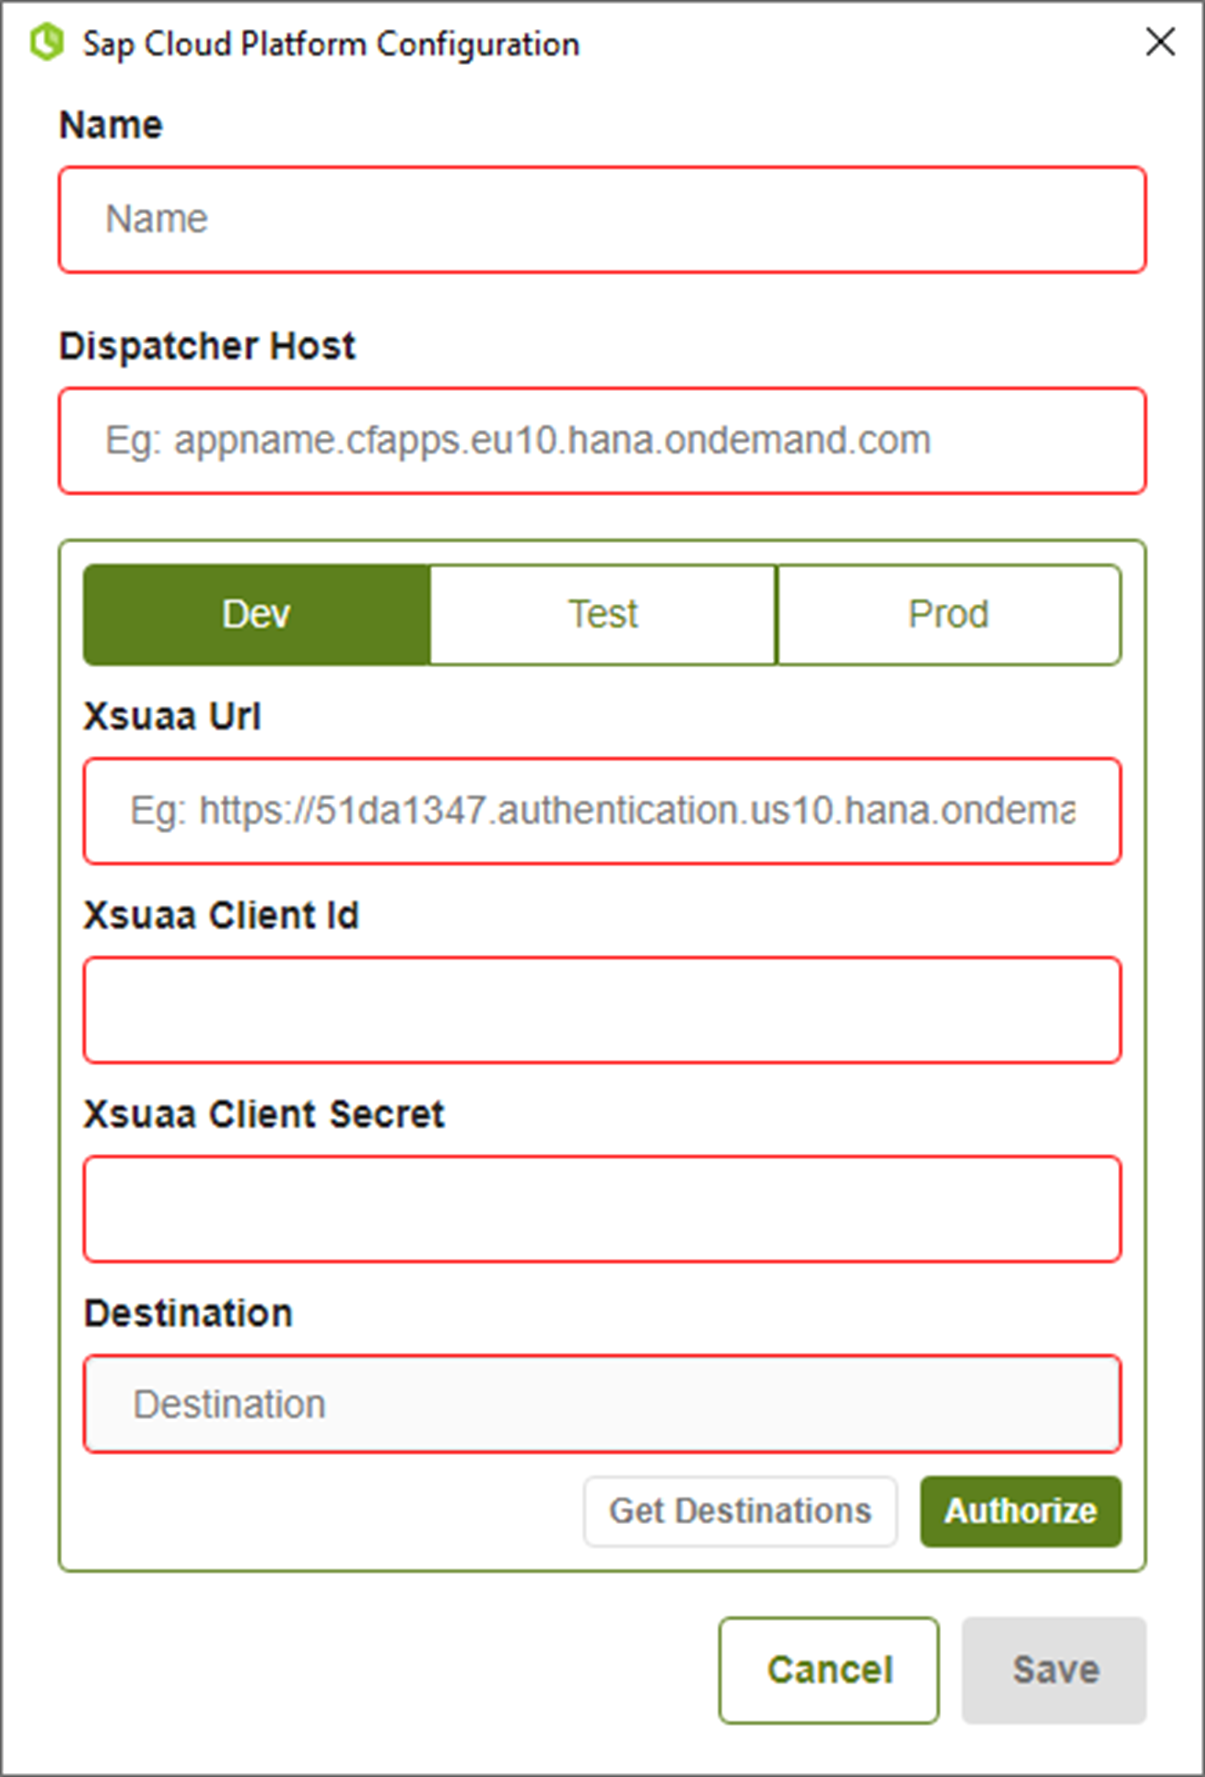
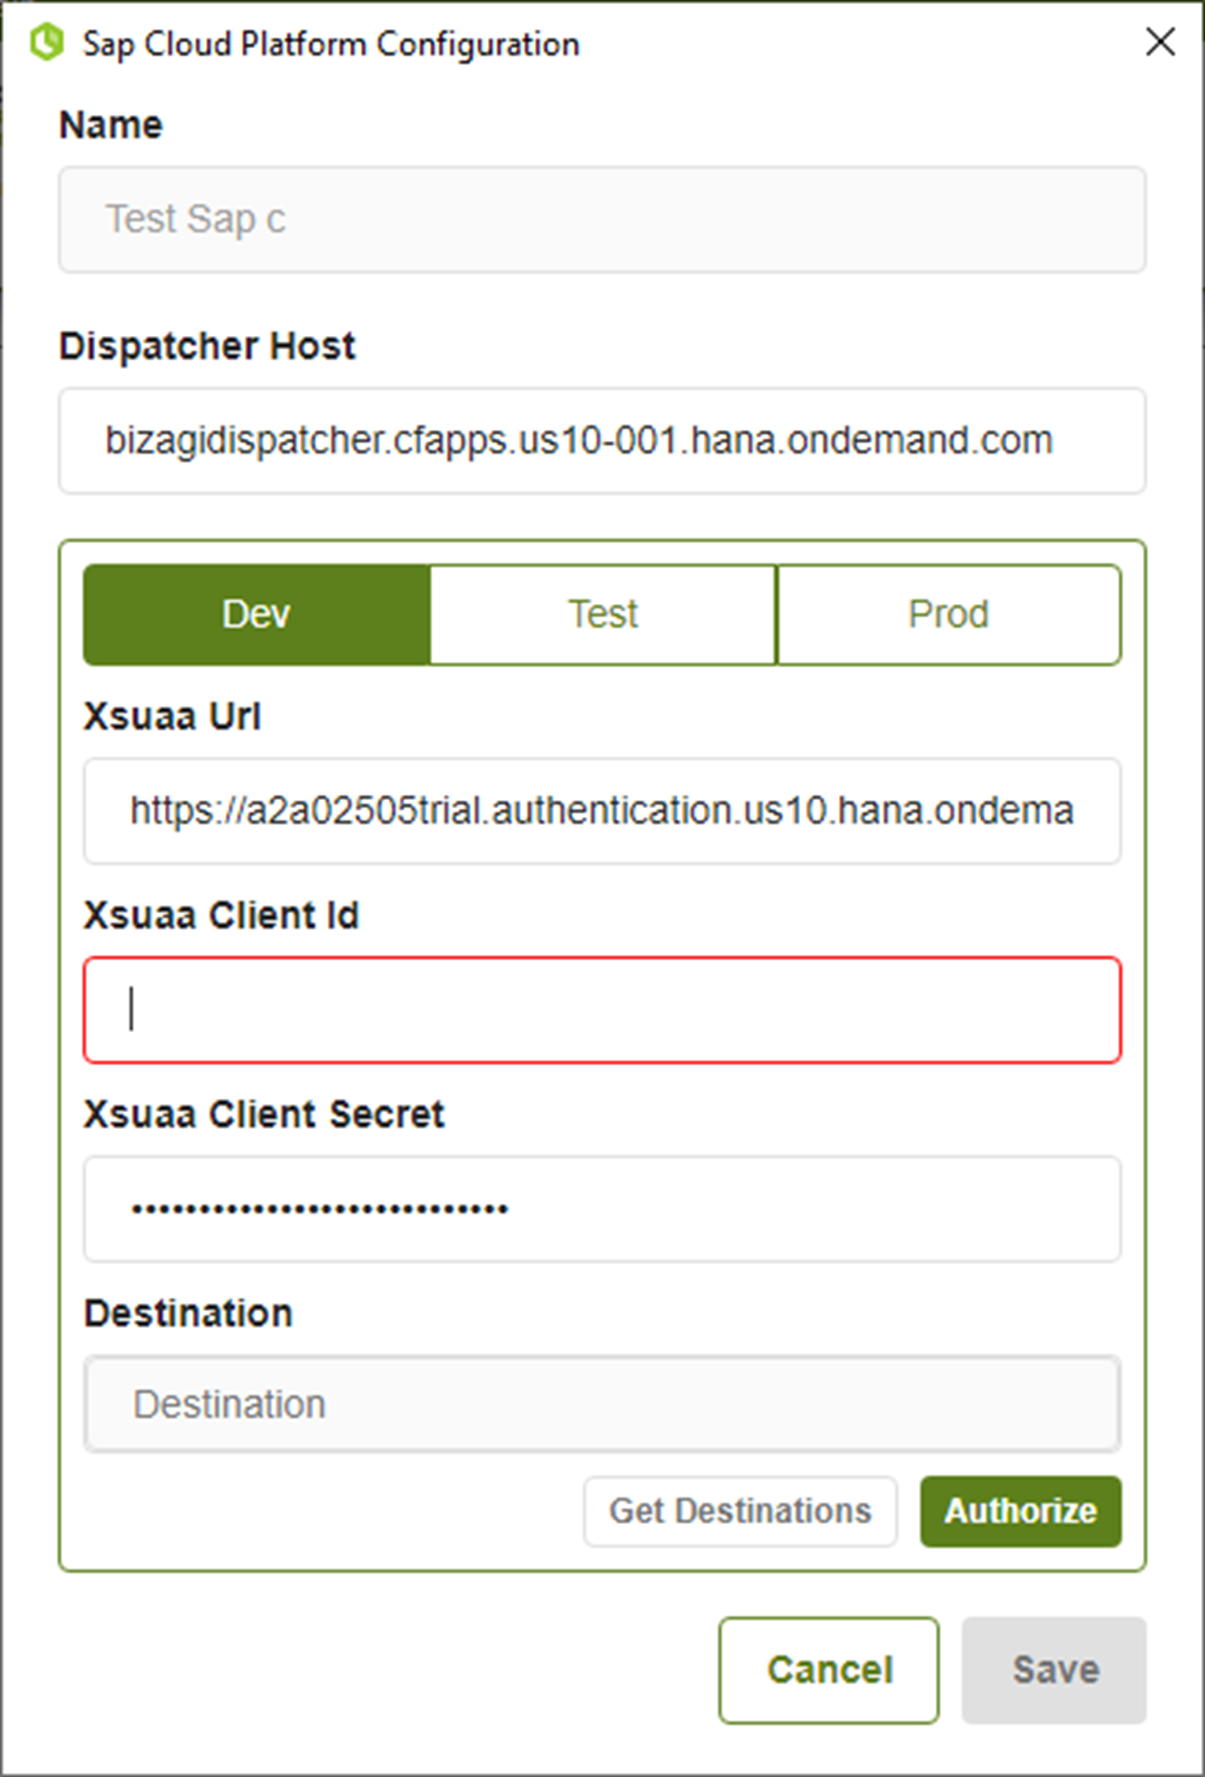
- In the SAP Cloud Platform Configuration form, all the fields are required and the outline of the entry is shown in red if there is an error:
- The Get Destinations button is enabled if there is a valid token generated with the Authorize button:
- When an input field is edited after the SAP Cloud Platform Configuration has been authorized, the Save button is disabled. To enable it, it is necessary to authorize and obtain the destinations again.

- If a SAP Cloud Platform connection is edited after 12 hours, it is possible that the token has expired. An error message like the following appears:
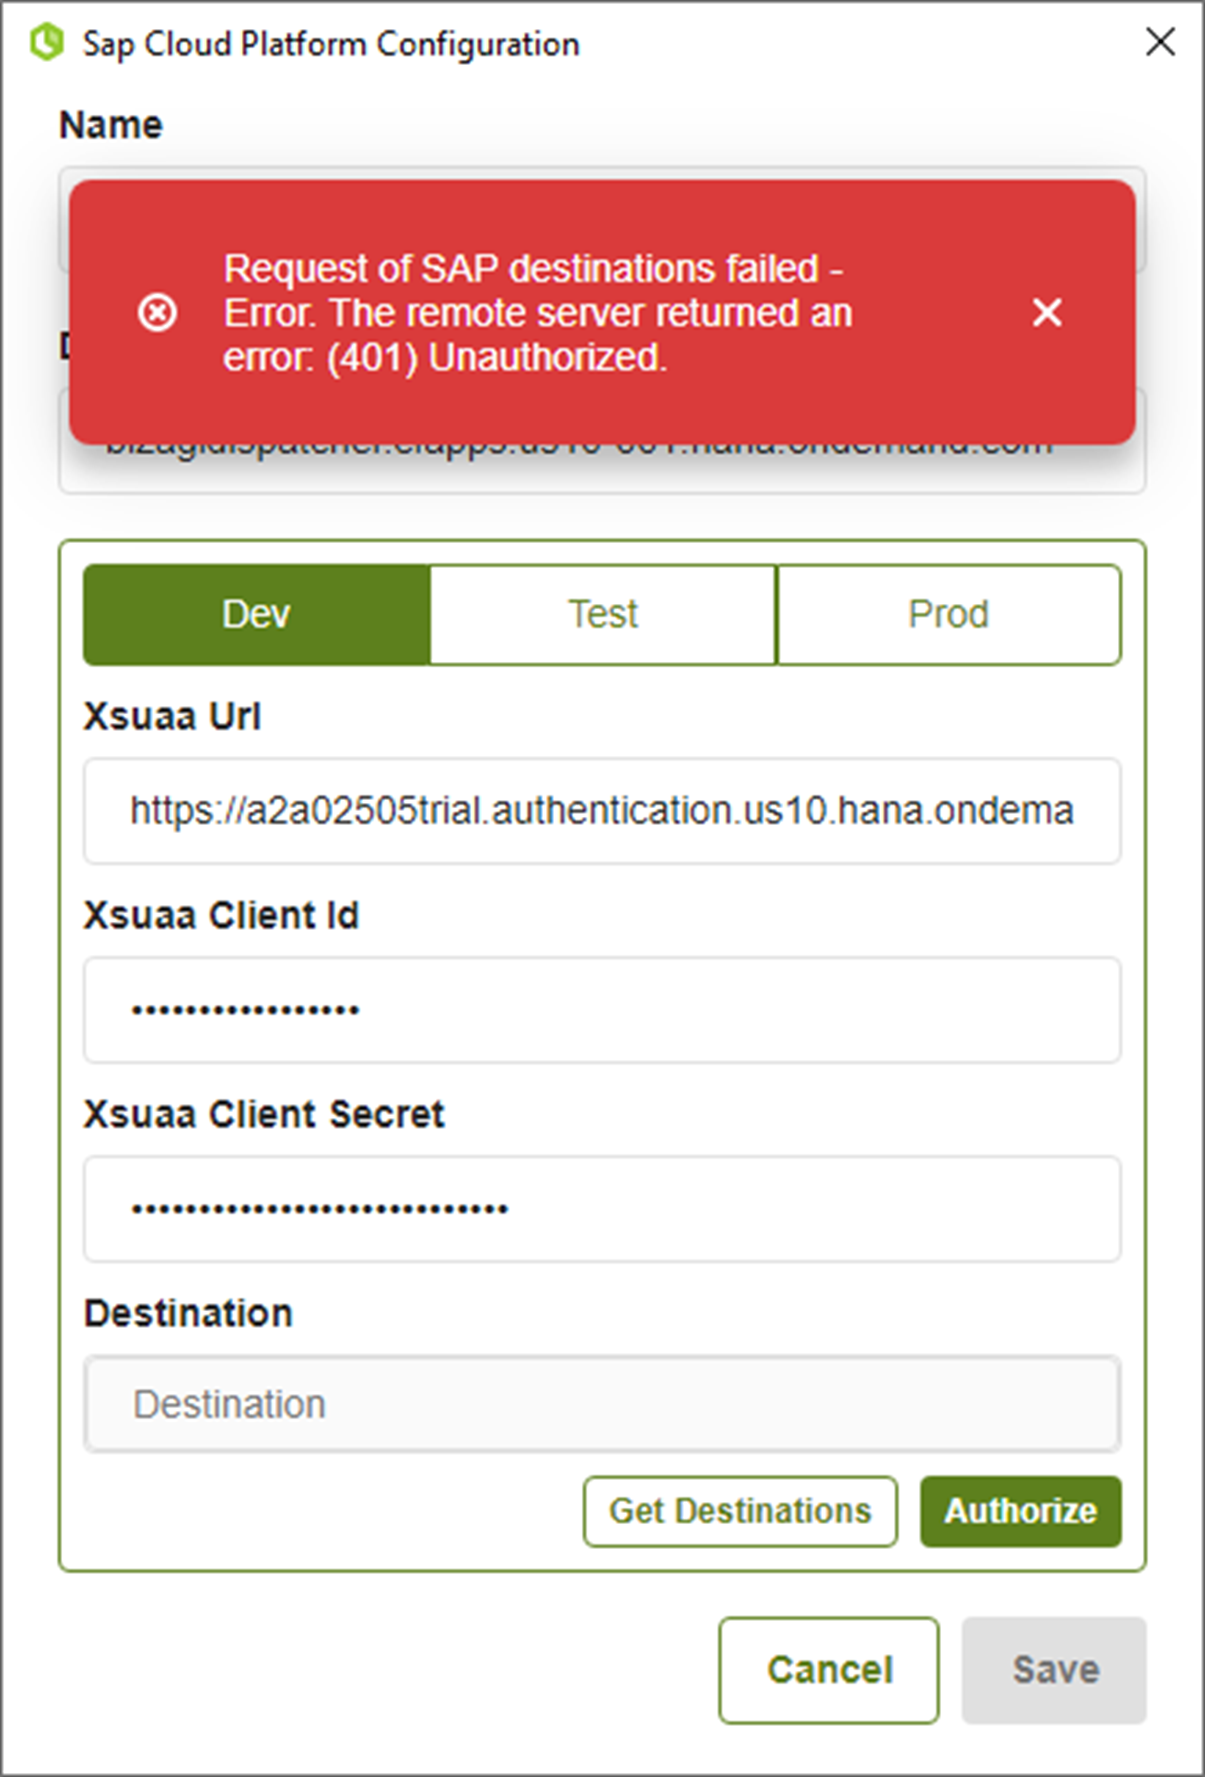
Thus, you need to authenticate again.
On-premises Management Console
It is possible to edit the SAP Cloud Platform configuration from the Management Console with the following input fields, so that the user can update the information required for OAuth2 code grant authentication:
- Xsuaa Url.
- Xsuaa Client Id.
- Xsuaa Client Secret.
Use cases in Bizagi Studio
- Enter the configuration of the SAP Cloud Platform connector you want to edit.
- Set the correct configuration to enable the Save button.
Define SAP actions available for Bizagi processes
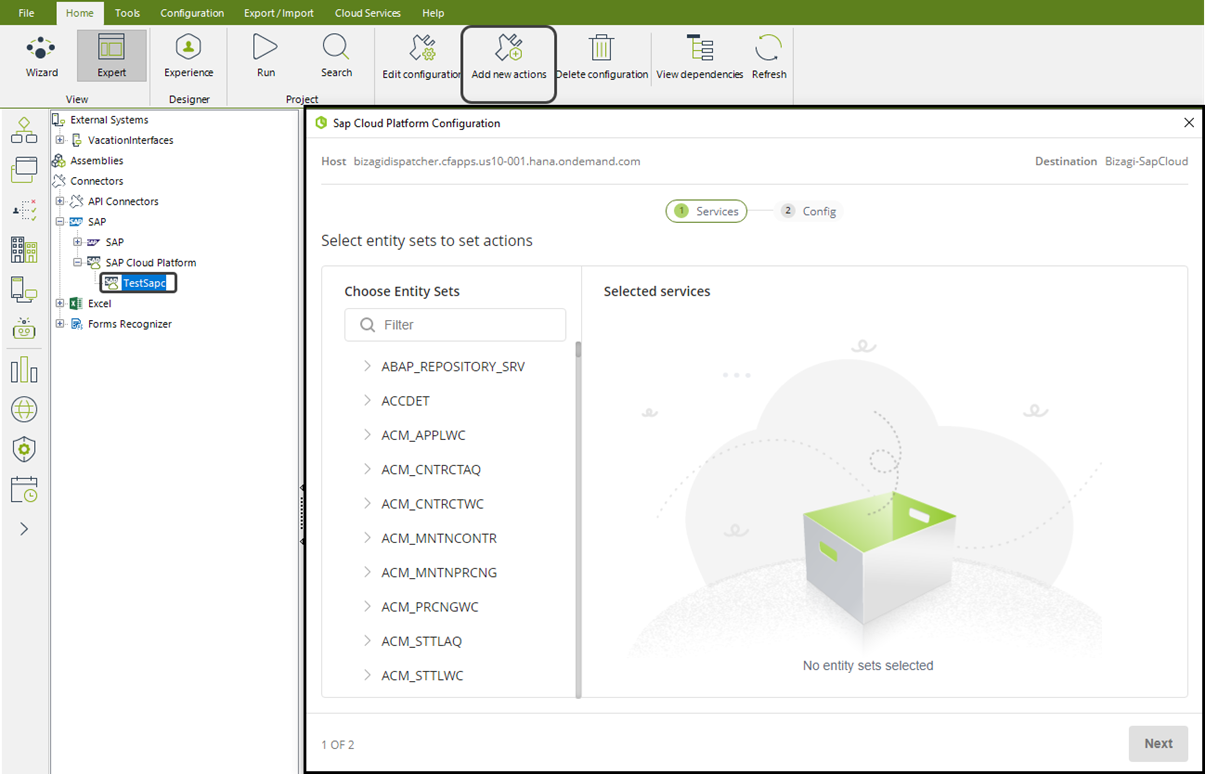
Your SAP system can expose multiple OData endpoints. Each endpoint can contain multiple actions that you can define in your connector and Bizagi processes can invoke. To do so, right click the name of your SAP configuration, and select Add new actions.
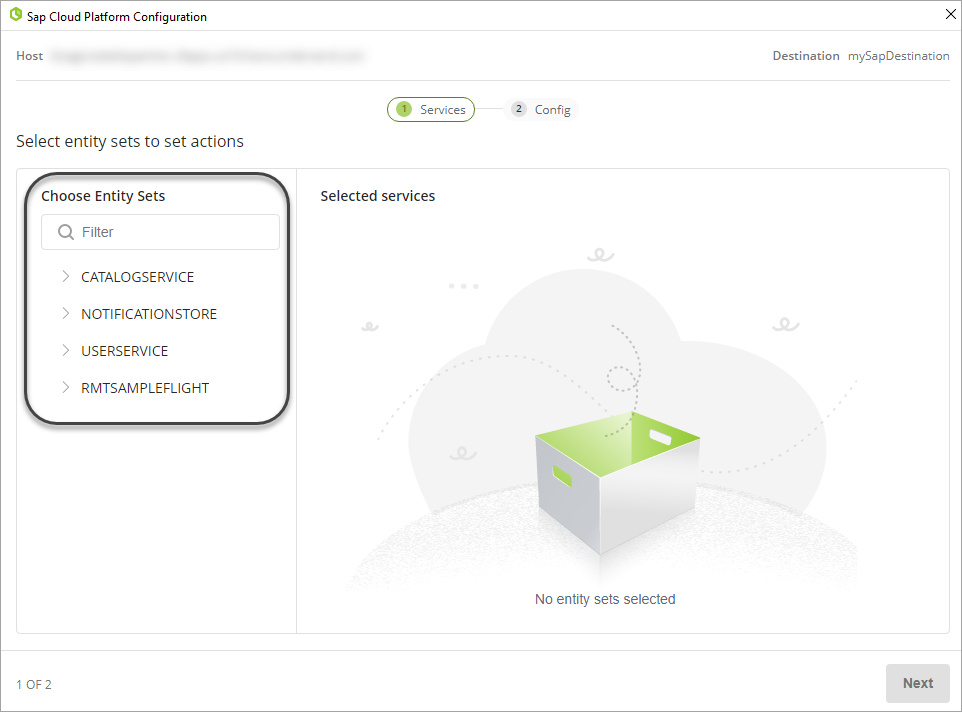
Bizagi displays the endpoints available through the OData layer of your SAP system. Each endpoint contains entity sets, which have actions that you can use in your Bizagi processes. You can search for endpoints using the filter text box.
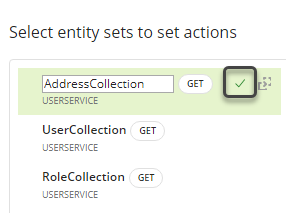
Open the endpoint to view the different entity sets. You can select each entity set by clicking the USERSERVICE check box.
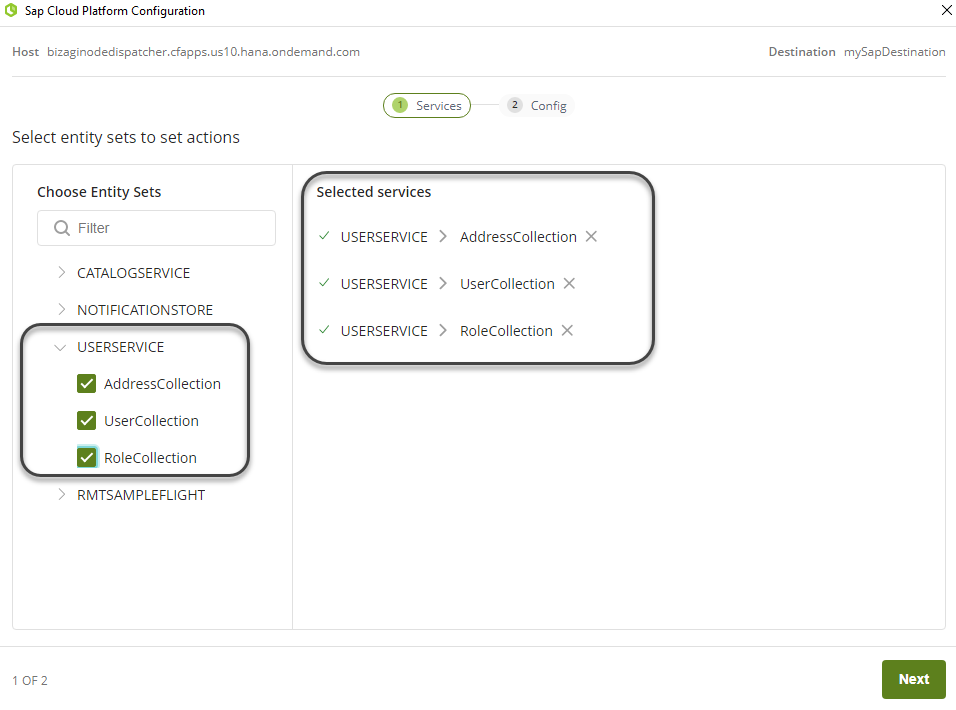
If you want to take out a service from the list, you can click the X icon next to each service name. After you review all the services, click Next.
Note:
If there is an error displaying the services after selecting them, it may be that the service is exposed as metadata but the entity set is not available.
Configure actions
SAP exposes actions within entity sets. One entity set can have different HTTP or HTTPS actions that you can enable. Each entity set is configurable in the following aspects:
- Change the entity set name
- Duplicate an entity set
- Delete duplicated entity sets
- Define the action type and attributes
Change the entity set name
Clicking the pencil icon, you can edit the entity set name. This name is displayed when you set the action in a process.
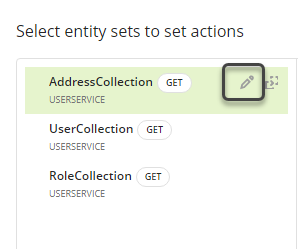
After changing the name, click the check icon to save it.
Duplicate an entity set
In the entity set list located on the left, you can see the duplicate icon next to each entity set. When you click this icon, all actions configured in that entity set are duplicated.

Delete duplicated entity sets
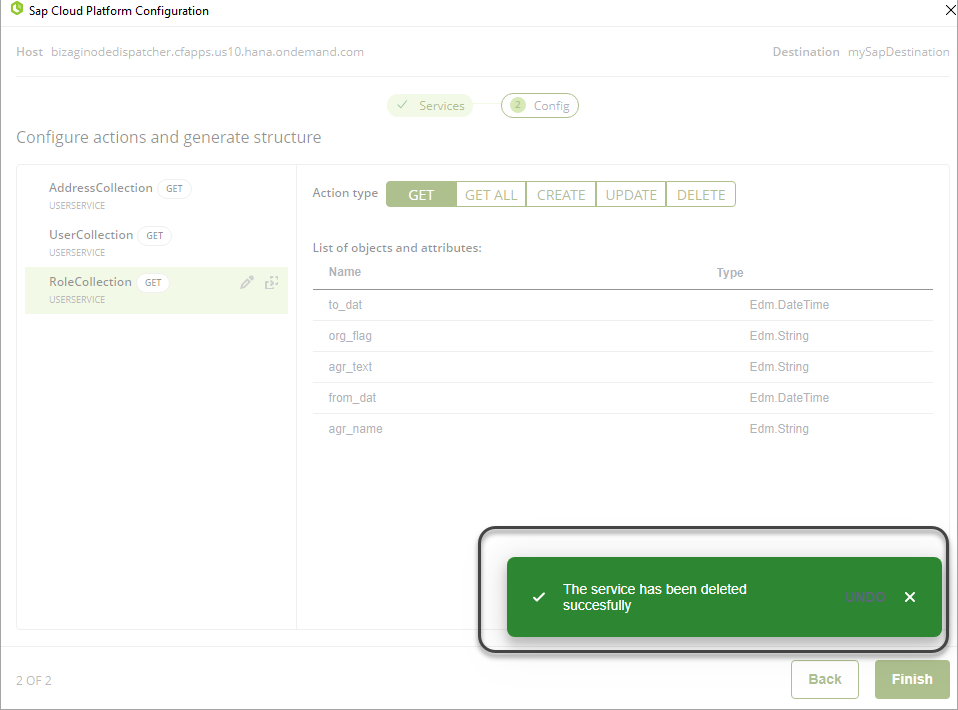
Next to a duplicated entity set, you can see the delete icon. Click this icon to delete the duplicated entity set.
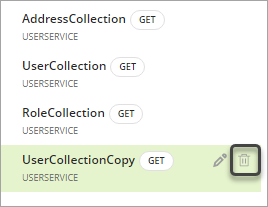
You can undo the deletion in the message box located at the bottom-right corner.
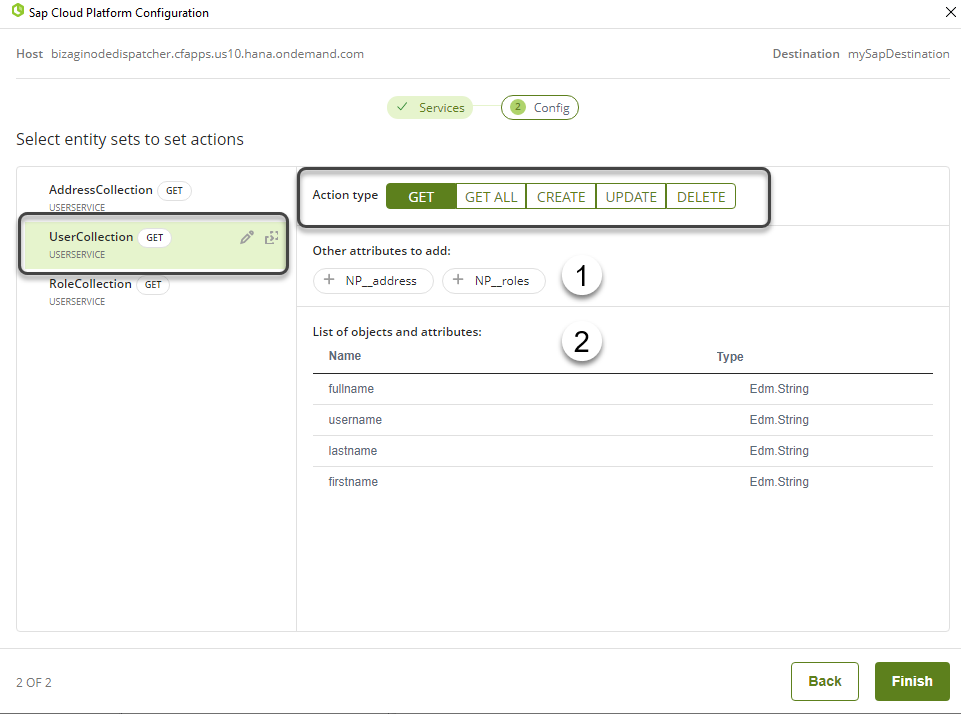
Define the action type and attributes
Similar to HTTP or HTTPS requests, each action has a set of possible execution types that let either consult, update, or delete records associated with the entity set. For example, you can consult (GET) the information of SAP users.
Bizagi lets use the following action types:
- GET
- GET ALL
- CREATE
- UPDATE
- DELETE
When you click each action, Bizagi displays all the action types available for that entity set. You can select ONE of the available action types. If you want different action types related to the same entity set, you can duplicate it.
Note:
An action type can be disabled due to SAP Cloud Platform restrictions. Disabled action types are displayed in grey.

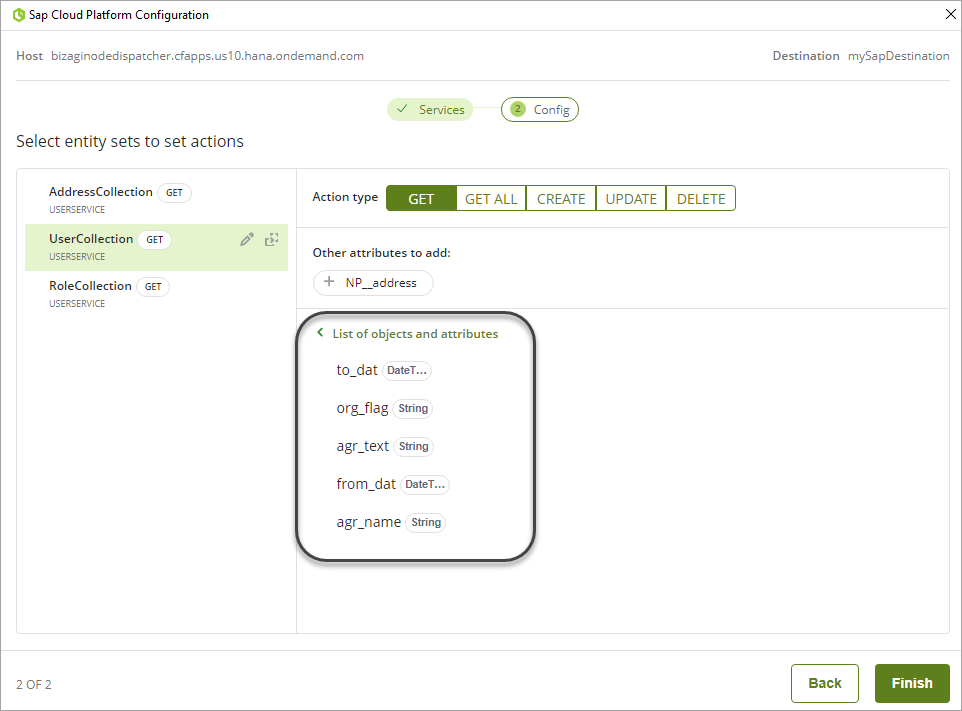
When you click each action type (e.g. GET), Bizagi displays two lists of attributes. These lists are attributes that can be obtained in the invocation of an action.
- Optional attributes: These attributes can be added by the Bizagi user configuring the action. They can be added or deleted in the configuration phase.
- Fixed attributes: Bizagi displays these attributes as read-only, showing the name and type of each attribute.
You can add optional attributes by clicking the plus symbol + next to the name of the attribute. When added, Bizagi displays them at the end of the attributes list. You can remove the attribute with the delete icon on the right.
Note:
You can add or delete optional attributes. Other attributes are displayed as read-only.
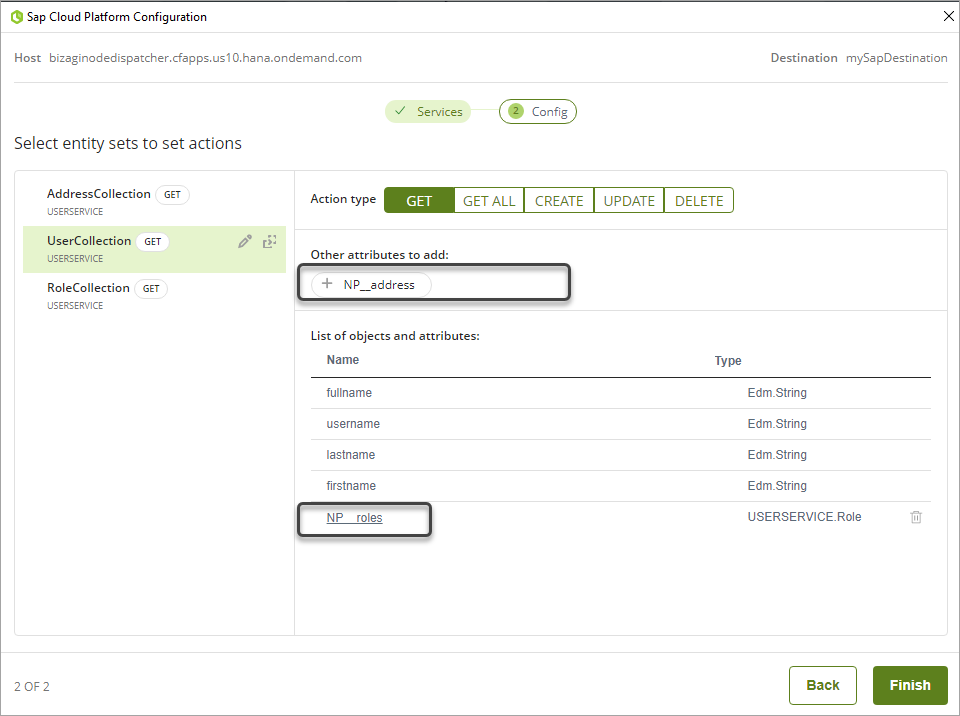
Optional attributes are usually an object, containing single attributes. When you click the optional attribute hyperlink, Bizagi displays the list of single attributes contained.
When you finish defining optional attributes for each action type, click Finish.
Next steps
Set the Bizagi process where you want to execute the SAP action