Other actions
In addition to the basic actions that allow changing the visibility, editability, binding, or format of a control, Bizagi offers a set of actions focused on improving the performance of forms.
These actions dynamically refresh specific controls of a form and allow defining the information that must be updated. This modern functionality without post-backs sends only the required information to widely improve performance in both mobile devices and desktops.
These actions include:
- Setting a value for a control
- Refreshing the value of a control based on one condition
- Using a button
- Executing a rule
- Executing an interface
- Executing the SAP connector
- Executing a connector
- Clearing the data for a control
- Collapsing a group
- Performing an action when a record of a collection is deleted
- Performing actions over form buttons
Set a value for a control
You can assign a specific value to a control included in a form when a condition is met by using actions.
Example
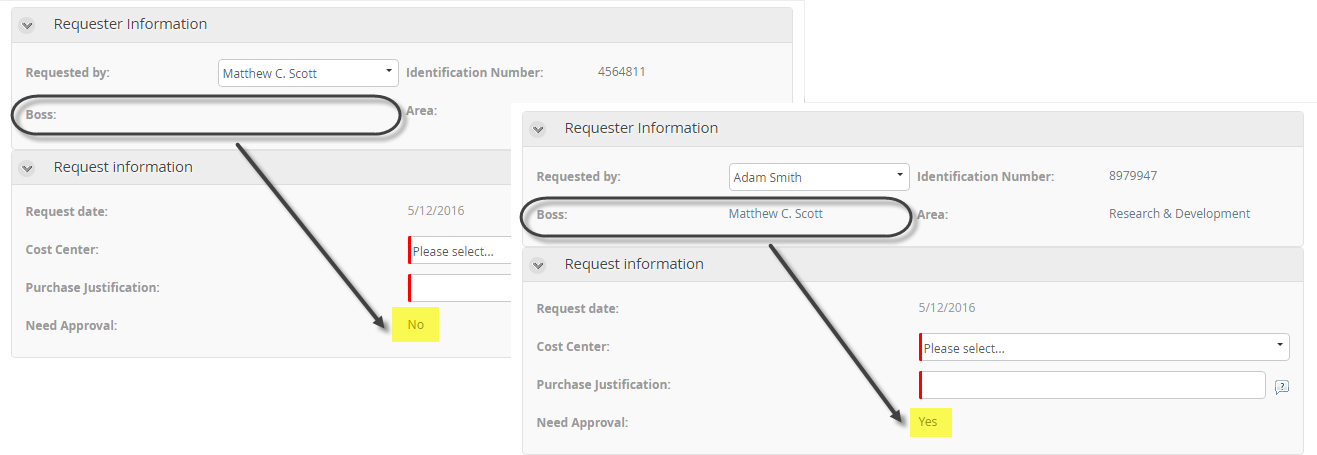
In a Purchase Request Process, if the requester has a boss, the request must be approved by him/her.
The Boss attribute contains the name of the requester's boss. The Need approval attribute identifies if the request must be approved or not.
If the Boss attribute does not contain information, it means the requester has no boss and then Need approval attribute has to be set to false.
To configure this action:
-
Create the Action
On the Forms designer, select Actions & Validations and add a new Action.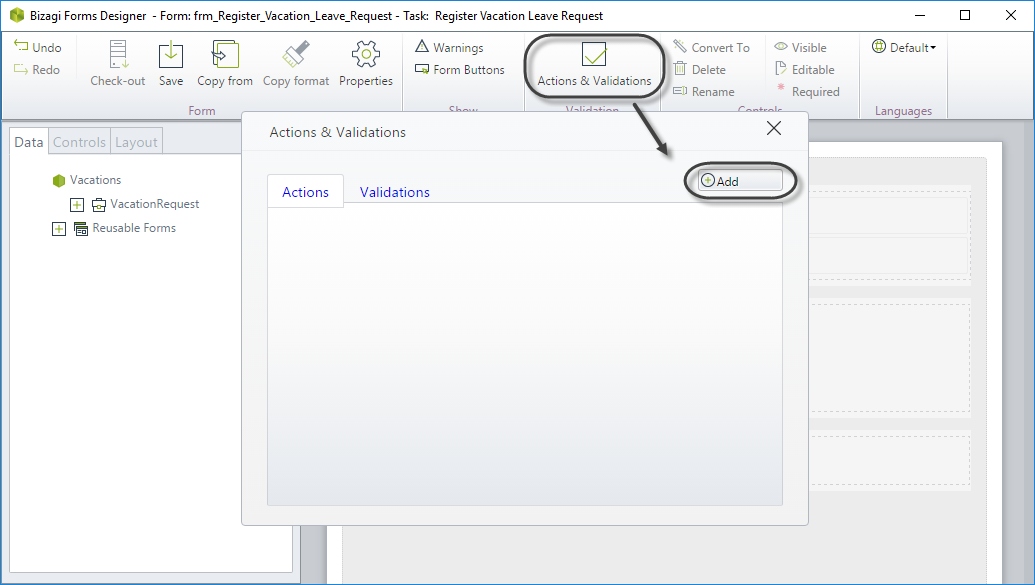
-
Include the condition
Click Add a condition and select the control, operator, and argument as follows:
When Boss is empty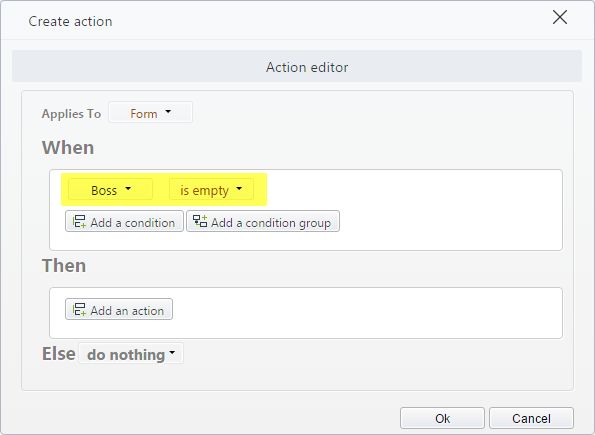
-
Include the Action (Then)
Click Add an action and define what will happen when the condition above is met:
Set value for Need Approval tofalse.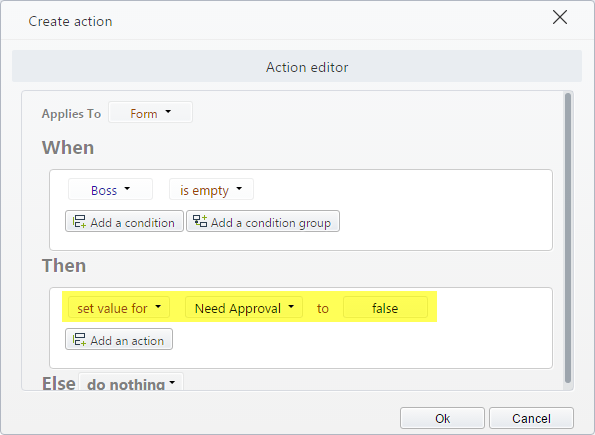
-
Define the Else Action, that will execute when the condition is NOT met.
Set value for Need Approval totrue.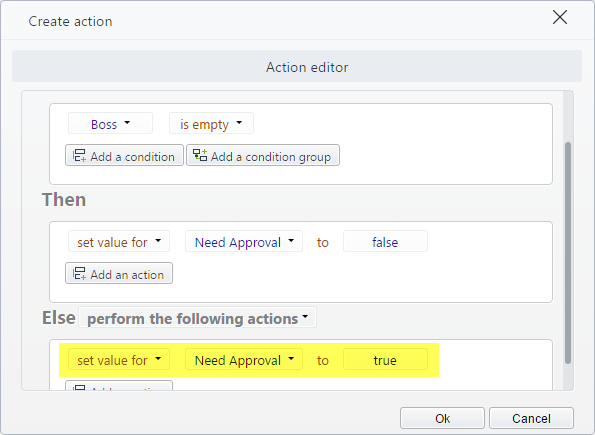
This is how the Work Portal will look like according to the person who makes the request:
Refresh the value of a control based on one condition
The Refresh command allows defining which controls have to be updated when a condition is met. Normally this condition responds to changes in the value of an attribute. This command is especially useful to improve the response times of the form by allowing update specific sections instead of the whole form, when it is not necessary.
After executing a Refresh, the engine evaluates if there is an action related with the control(s) to be refreshed. If so, the actions of these controls are executed again to keep the state of the form.
Example
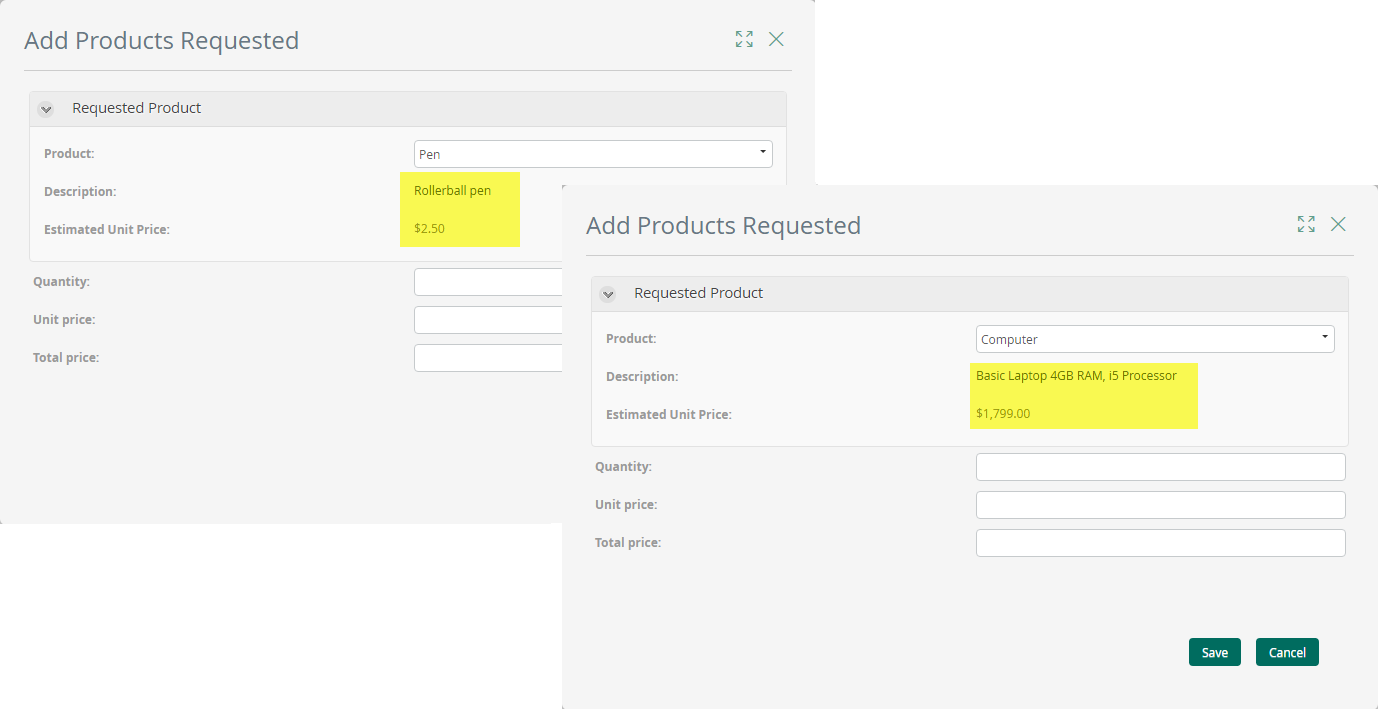
In a Purchase Request Process, when the requester selects a product to include, the product description and estimated price have to be updated. These attributes belong to a parameter entity, so they are related.
To update only the required fields, you must use actions.
-
Create the Action
On the Forms designer, select Actions & Validations and add a new Action. -
Include the condition
Click Add a condition and select the control, operator, and argument as follows:
When Product changes
-
Include the Action (Then)
Click Add an action and define what will happen when the condition above is met:
Refresh Description and Estimated Price.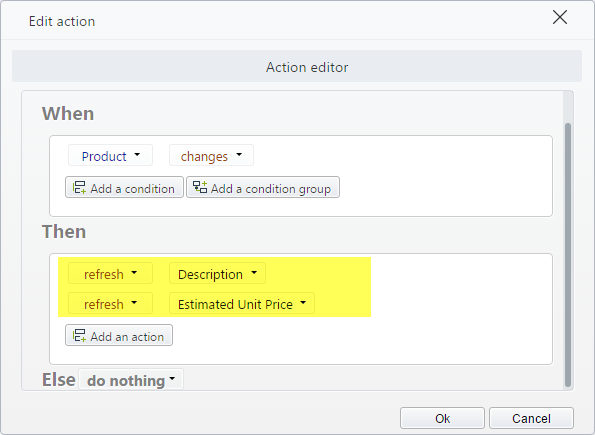
-
Define the Else Action
In this case, no action will execute when the condition is NOT met, so leave this option as Do nothing.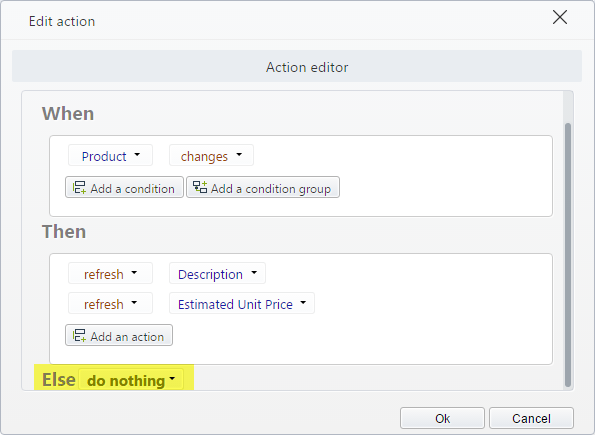
This is how the Work Portal will behave when changing the selected product:
Use a button
Actions can be used to define what to do when a button is clicked. Using actions instead of specific behaviors configured directly in a button allows executing the desired actions without refreshing the entire form. Only the controls specified to be refreshed will be updated.
Example
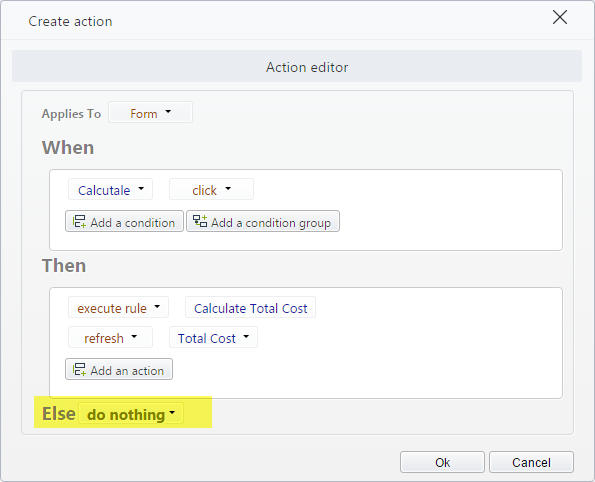
In a Purchase Request Process, a button is used to calculate the total cost of the purchase including taxes and discounts.
When clicked, the button executes an expression to obtain the total value. As we want only the Total Cost control to be updated when the button is clicked, we should use an action.
To configure this action:
-
Include the button in the form.
Drag and drop a button control from the Controls panel. Name it Calculate.
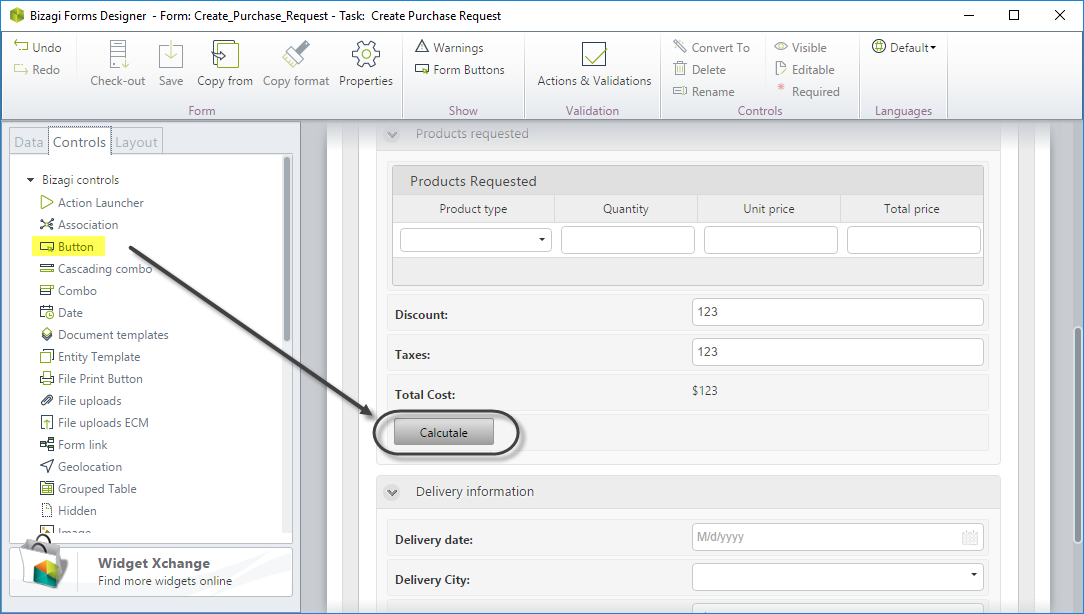
-
Create the Action.
Select Actions & Validations and add a new Action.
-
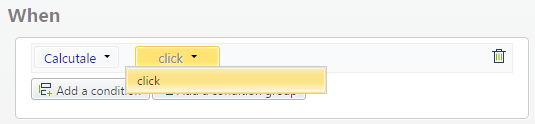
Include the condition.
Click Add a condition and select the button in the controls field. The click option will be available to identify when the button has been clicked.
The condition would be When Calculate click.
-
Include the Action (Then).
Click Add an action and define what will happen when the condition above is met.
Select Execute rule as the command and then find the rule in the expressions editor.
In this case, the rule to totalize the purchase's cost is called Calculate Total Cost.
The action would be Execute rule Calculate Total Cost.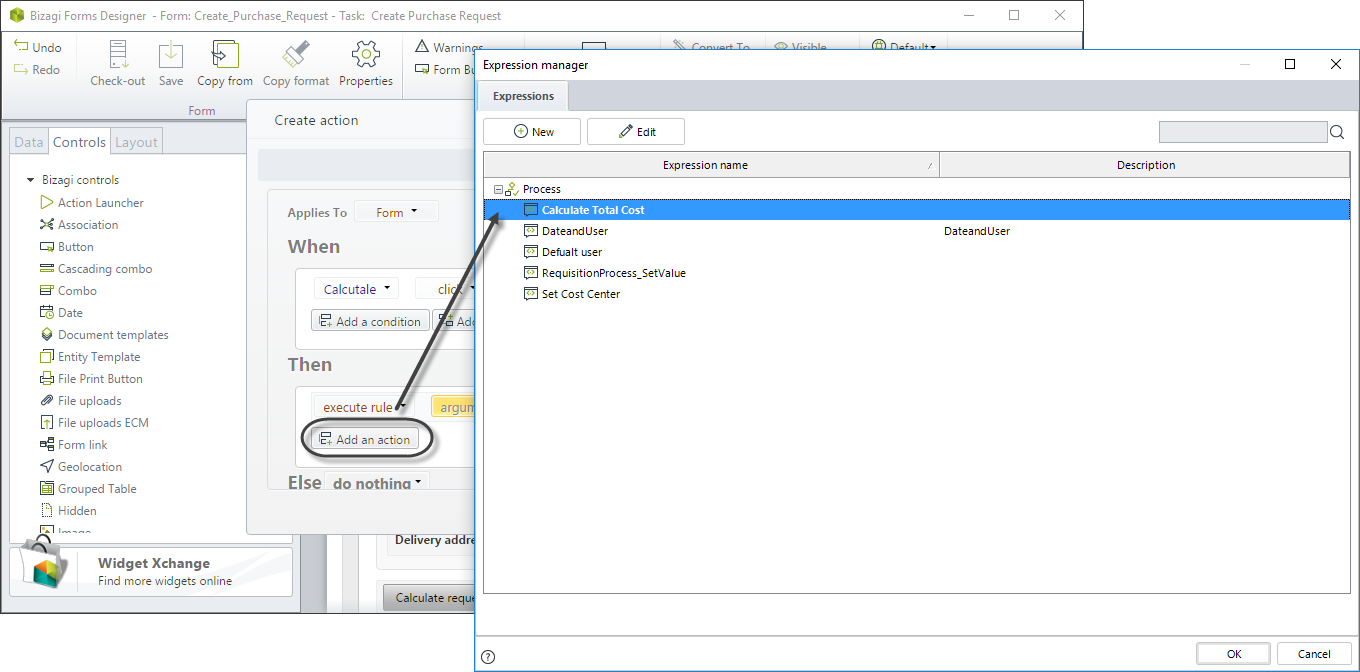
-
Update affected controls.
Click Add an action and define the controls that have to be updated after executing the rule. To do so, use the Refresh command.
In this case, the control to refresh is Total Cost.
Refresh Total Cost.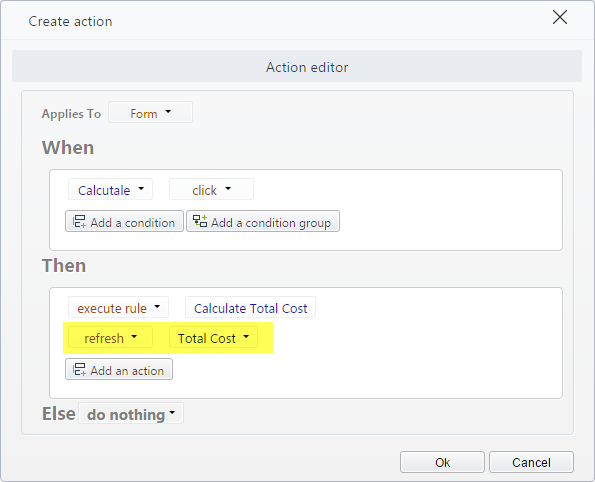
-
Define the Else Action.
In this case, no action will execute when the condition is NOT met, so leave this option in Do nothing.
This is how the information is updated when clicking the button:

Execute a rule
Actions allow executing rules when specific business conditions are met. Using actions to execute rules instead of using on-save events or independent buttons allows updating only the fields that are affected by the rule execution, instead of refreshing the whole form.
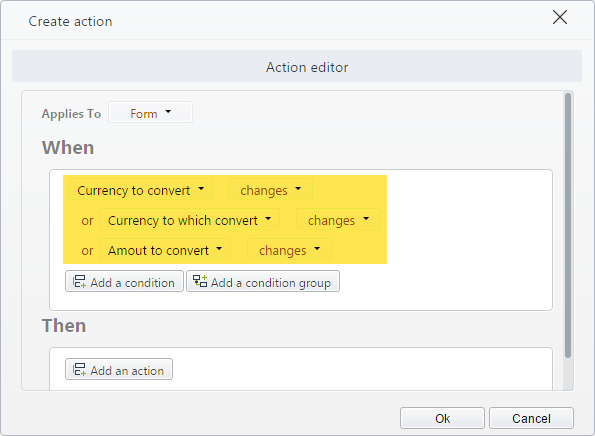
Example
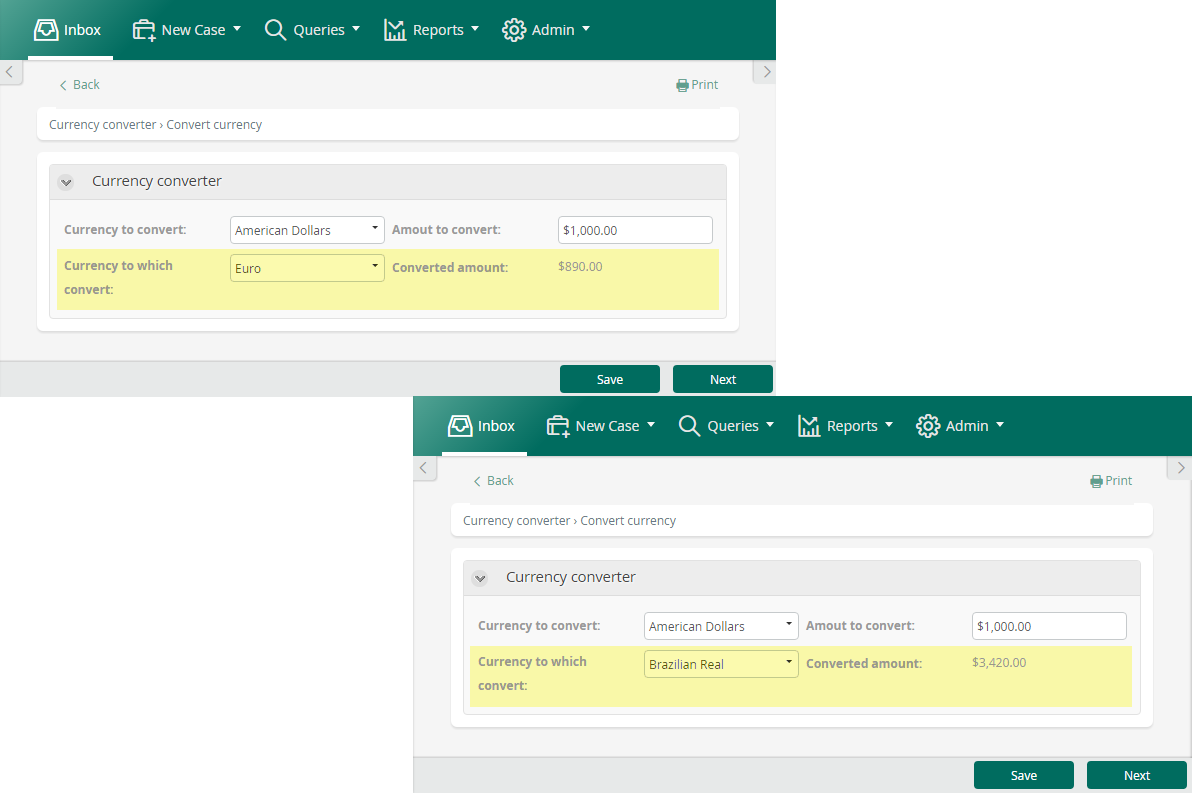
A process to support international trade operations uses a currency converter in the form of one of its activities. As with any converter, the user has to enter the amount to convert, the currency of this amount, and the currency to which it should be converted.
When the value of any field changes, the calculation must be updated to reflect the change. The calculation is done through an expression called Convert currency.
An action is used to identify when the value in any of these fields has changed and to execute the rule that makes the conversion.
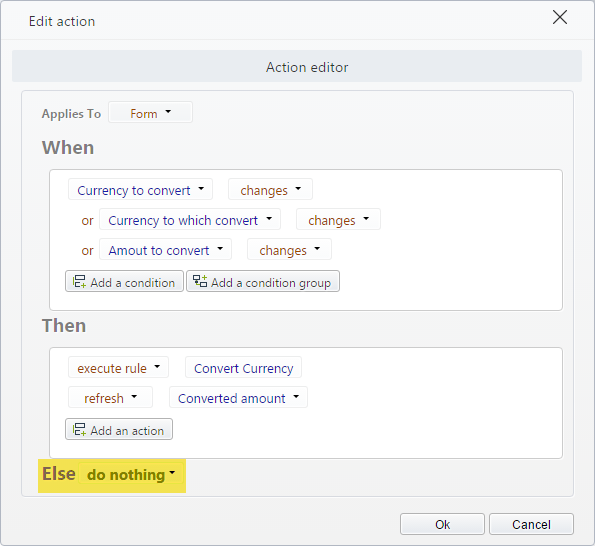
To configure this action:
-
Create the Action.
On the Forms designer, select Actions & Validations and add a new Action.
-
Include the condition.
Click Add a condition and select the controls, operators, and arguments as follows:
When Amount changes OR Amount currency changes OR ConvertTo changes.
-
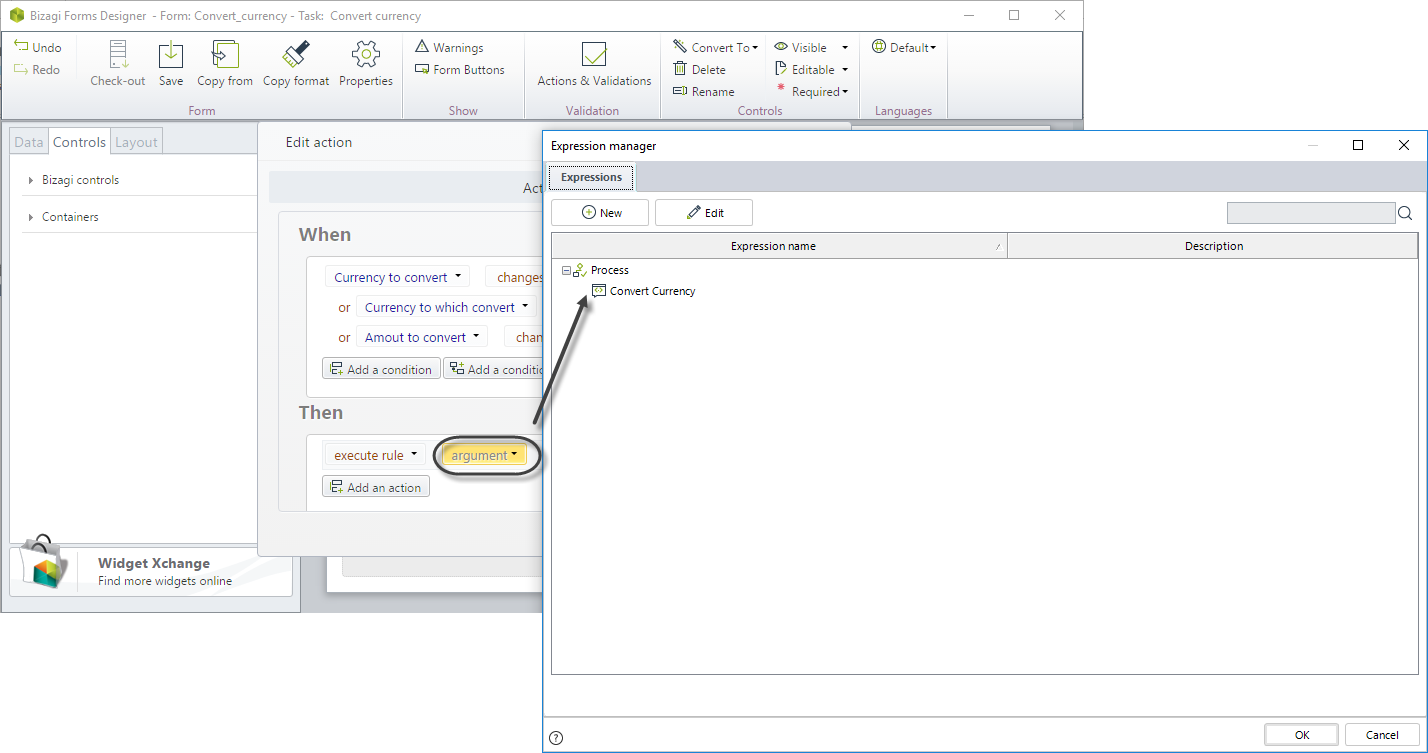
Include the Action (Then).
Click Add an action and define what will happen when the condition above is met.
Select Execute rule as the command and then find the rule in the expressions editor.
Execute Rule Convert Currency.
-
Update affected controls.
Click Add an action and define the controls that have to be updated after executing the rule. To do so, use the Refresh command.
In this case, the control to refresh is Converted amount.
Refresh Converted amount.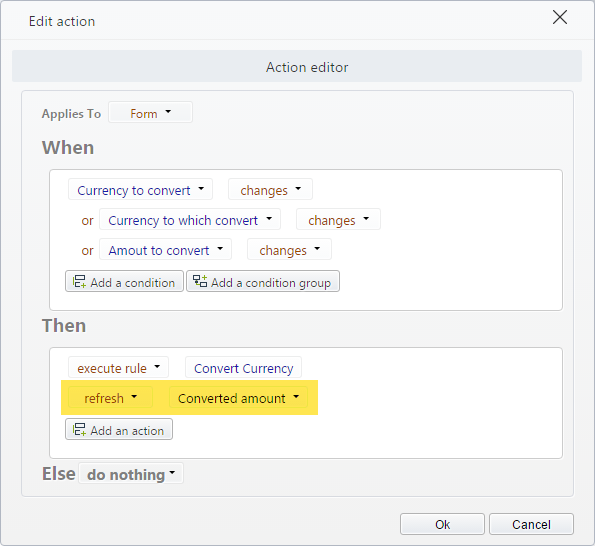
-
Define the Else Action.
In this case, no action will execute when the condition is NOT met, so select the option Do nothing.
This is how the Work Portal will behave when one of its fields changes:
Execute an interface
Actions allow executing interfaces when specific business conditions are met. Using actions to execute interfaces instead of using on-save events or independent buttons allows updating only the fields that are affected by the interface execution, instead of refreshing the whole form.
Example
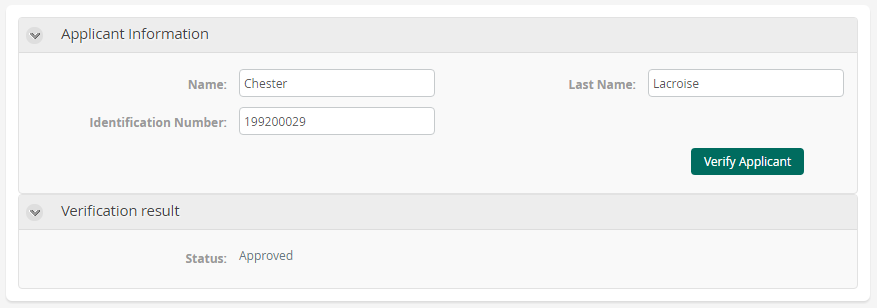
In a Loan Request Process, an applicant can be verified in the blacklist at any moment. As the blacklist is in an external system, an interface is used to perform the verification. To do so, the applicant's identification number is entered, and then a button has to be clicked to execute the interface.
An action has to be defined to configure this behavior.
-
Include the button in the form
Drag and drop a button control from the Controls panel. Name it Verify Applicant.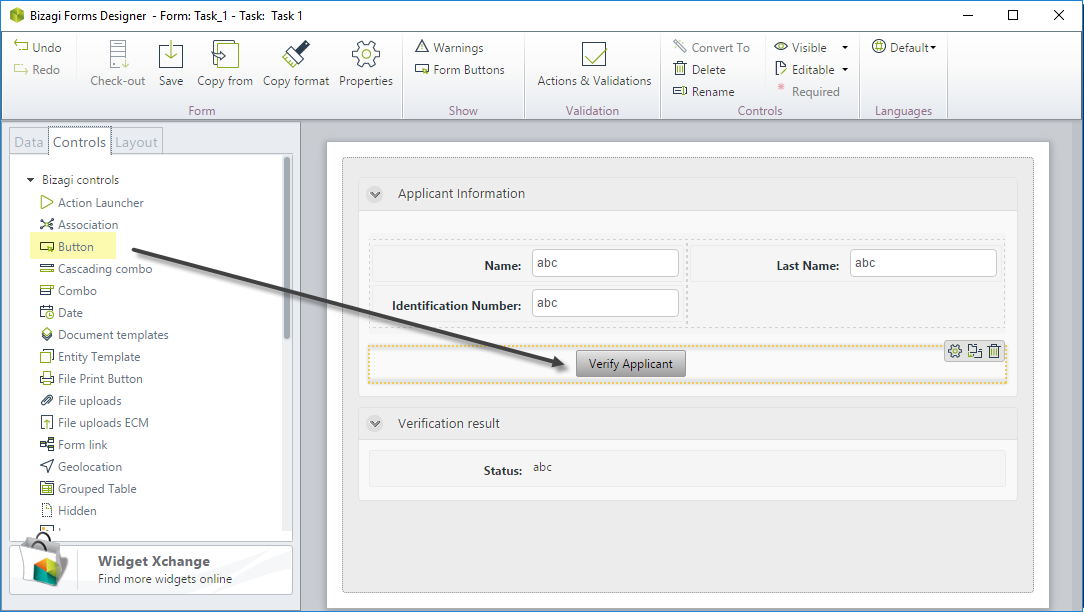
-
Create the Action
Select Actions & Validations and add a new Action. -
Include the condition
Click Add a condition and select the control, operator, and argument. Select the click option to identify when the button has been clicked.
The condition would be:
When Verify Applicant click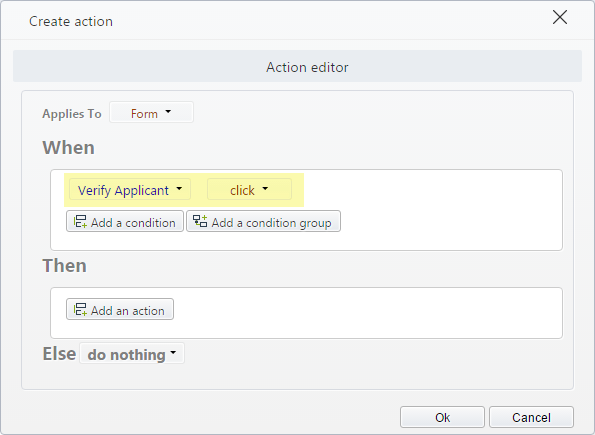
-
Include the Action (Then)
Click Add an action and define what will happen when the condition above is met:
Select Execute interface and configure the desired interface.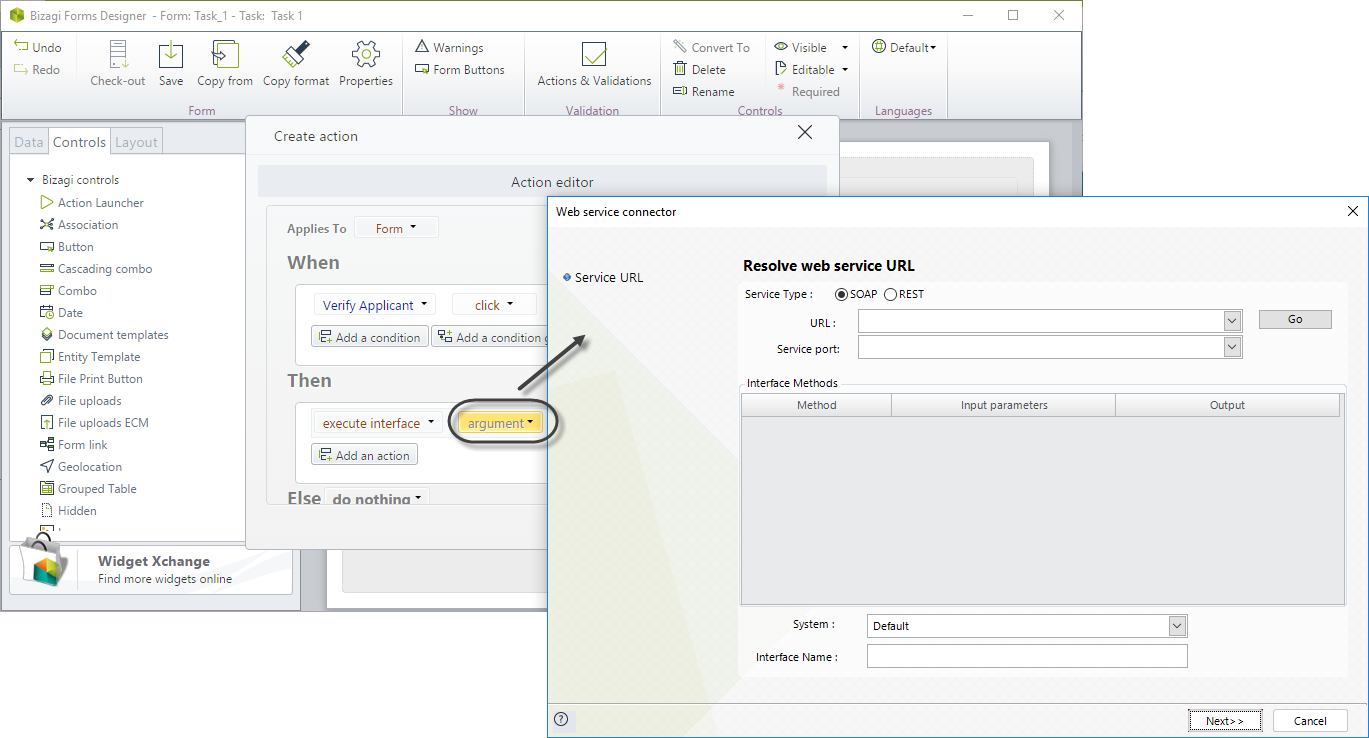
For further information about how to configure interfaces, please refer to Invoking external services from Bizagi.
-
Update affected controls
Click Add an action and define the controls that have to be updated after executing the interface. To do so, use the Refresh command.
In this case, the control to refresh is Status.
Refresh Status.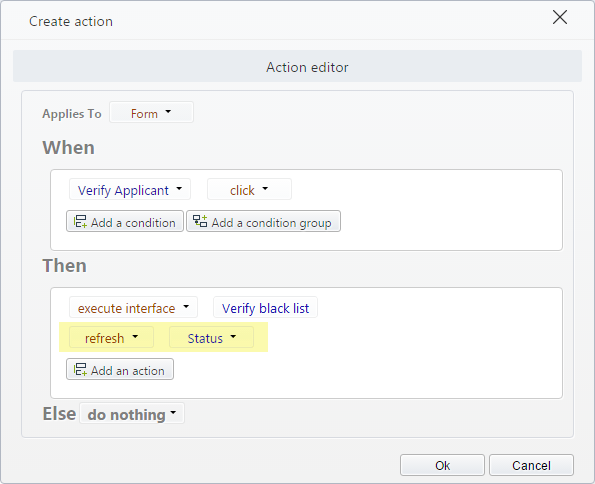
-
Define the Else Action
In this case, no action will execute when the condition is NOT met, so select the option Do nothing.
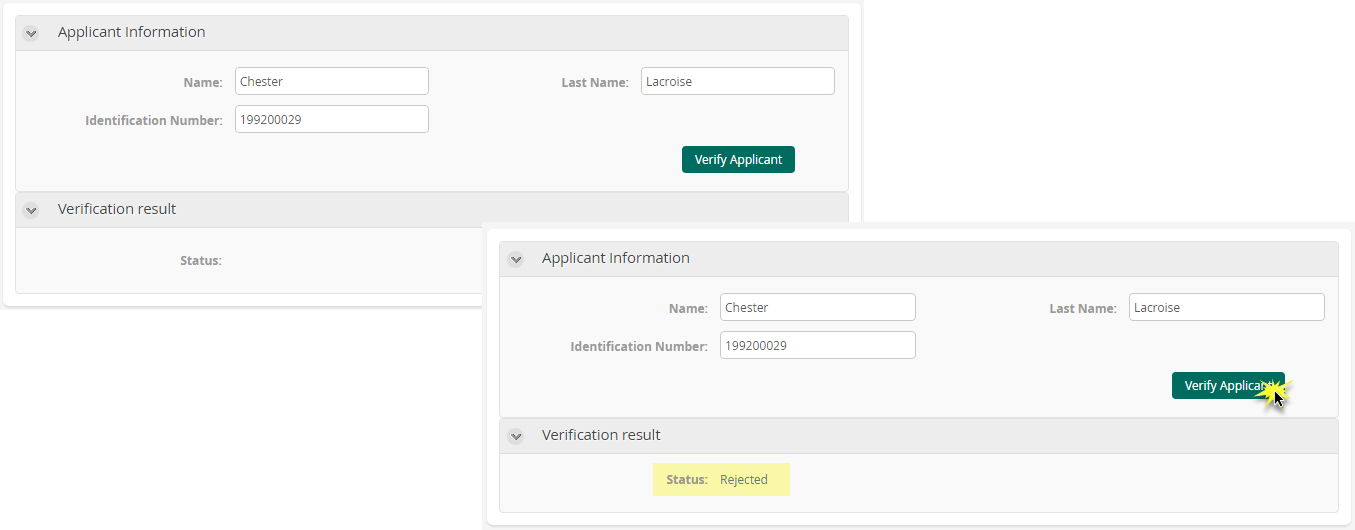
From the Work Portal, when the user clicks the button, the interface will be executed.
Executing the SAP connector
Actions allow executing the out-of-the-box SAP connector instead of using on-save events, enabling the exclusive update of the fields that are affected by the SAP connector's execution.
Example
In a Flight booking Process, the activity Request flight fetches the available flight information using an SAP system. Follow the example presented in the SAP example. The SAP connector must be previously configured before being able to use it.
Executing a connector
Actions allow executing previously configured connectors when specific business conditions are met. Use actions to execute connectors instead of using on-save events, allowing the exclusive update of the fields affected by the connector's execution, instead of refreshing the whole form.
Example
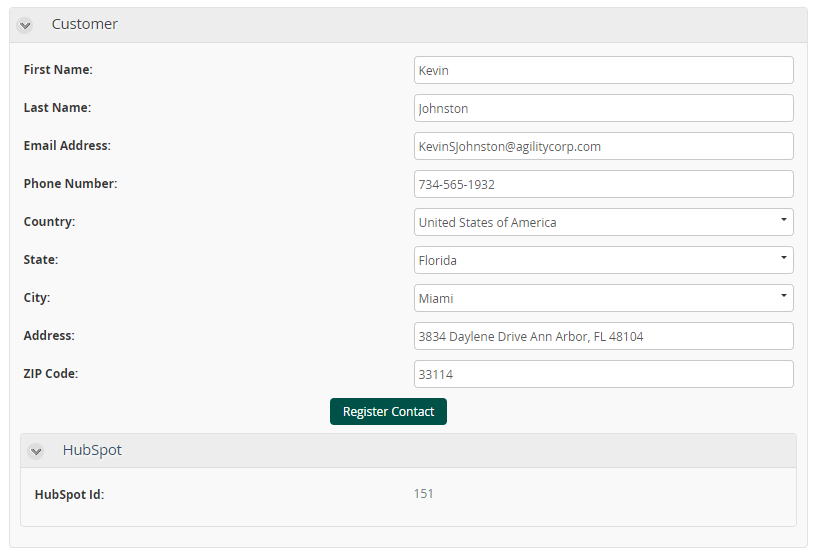
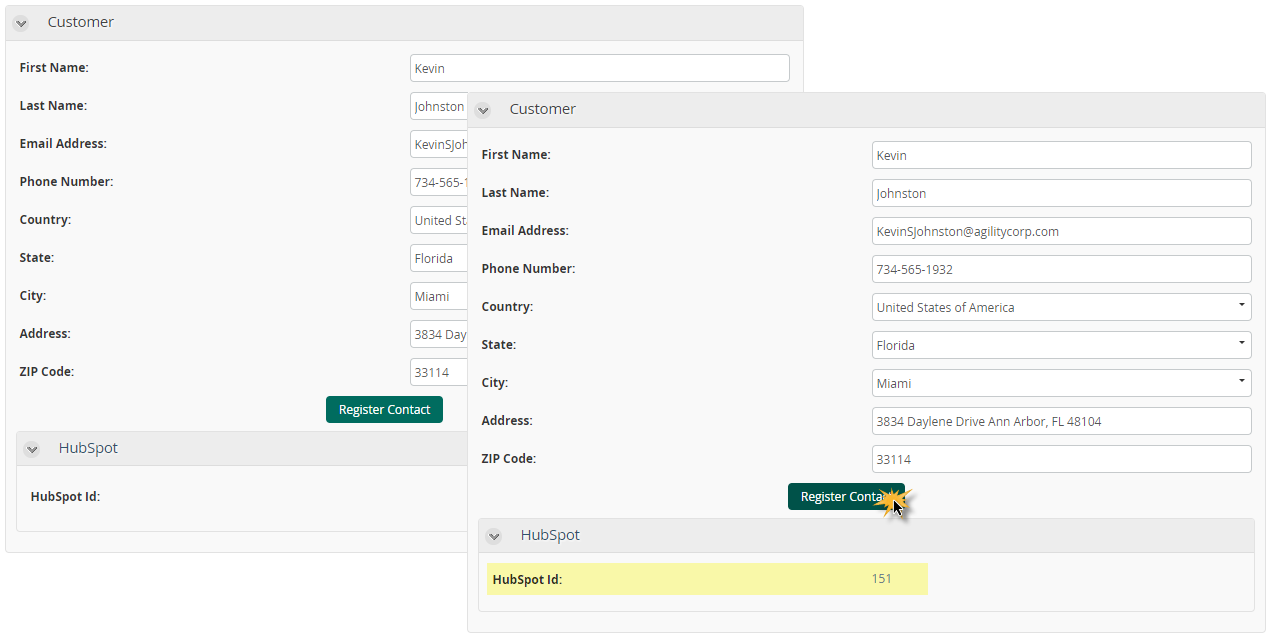
In an Opportunity Management Process, the customer has to be registered as a Contact in HubSpot before the Register Opportunity activity can be completed. To connect with the HubSpot account, a connector available in Bizagi Connectors Exchange is used to register the contact. The customer's information is entered, and a button has to be clicked to execute the connector.
Before following the next steps, recall that the connector has to be previously installed and configured. For more information, please refer to Installing and configuring connectors.
Once the connector has been installed and configured, an action is defined to configure this behavior.
-
Include the button in the form
Drag and drop a button control from the Controls panel. Name it Register Contact.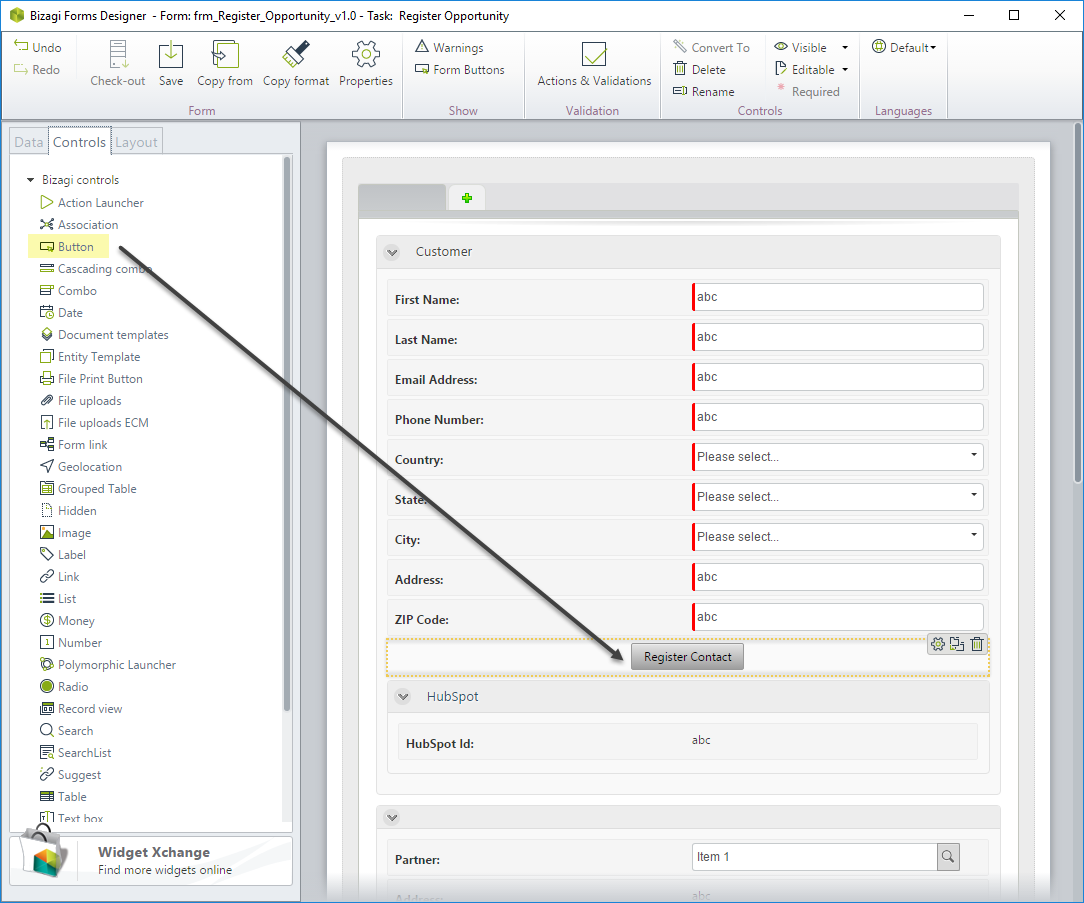
-
Create the Action
Select Actions & Validations and add a new Action. -
Include the condition
Click Add a condition and select the control, operator, and argument. Select the click option to identify when the button has been clicked.
The condition would be:
When Register Contact click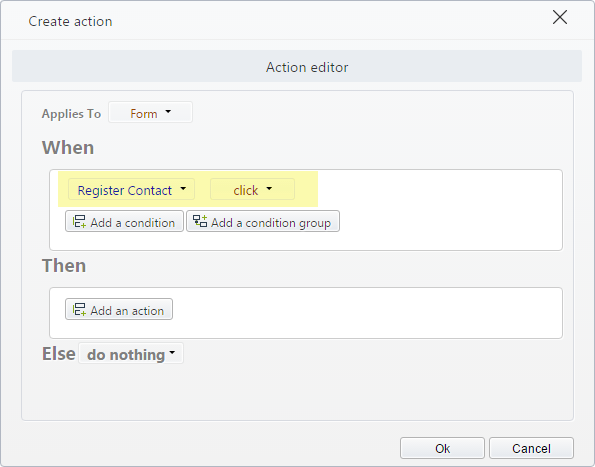
-
Include the Action (Then)
Click Add an action and define what will happen when the condition above is met:
Select Execute connector and configure the desired connector.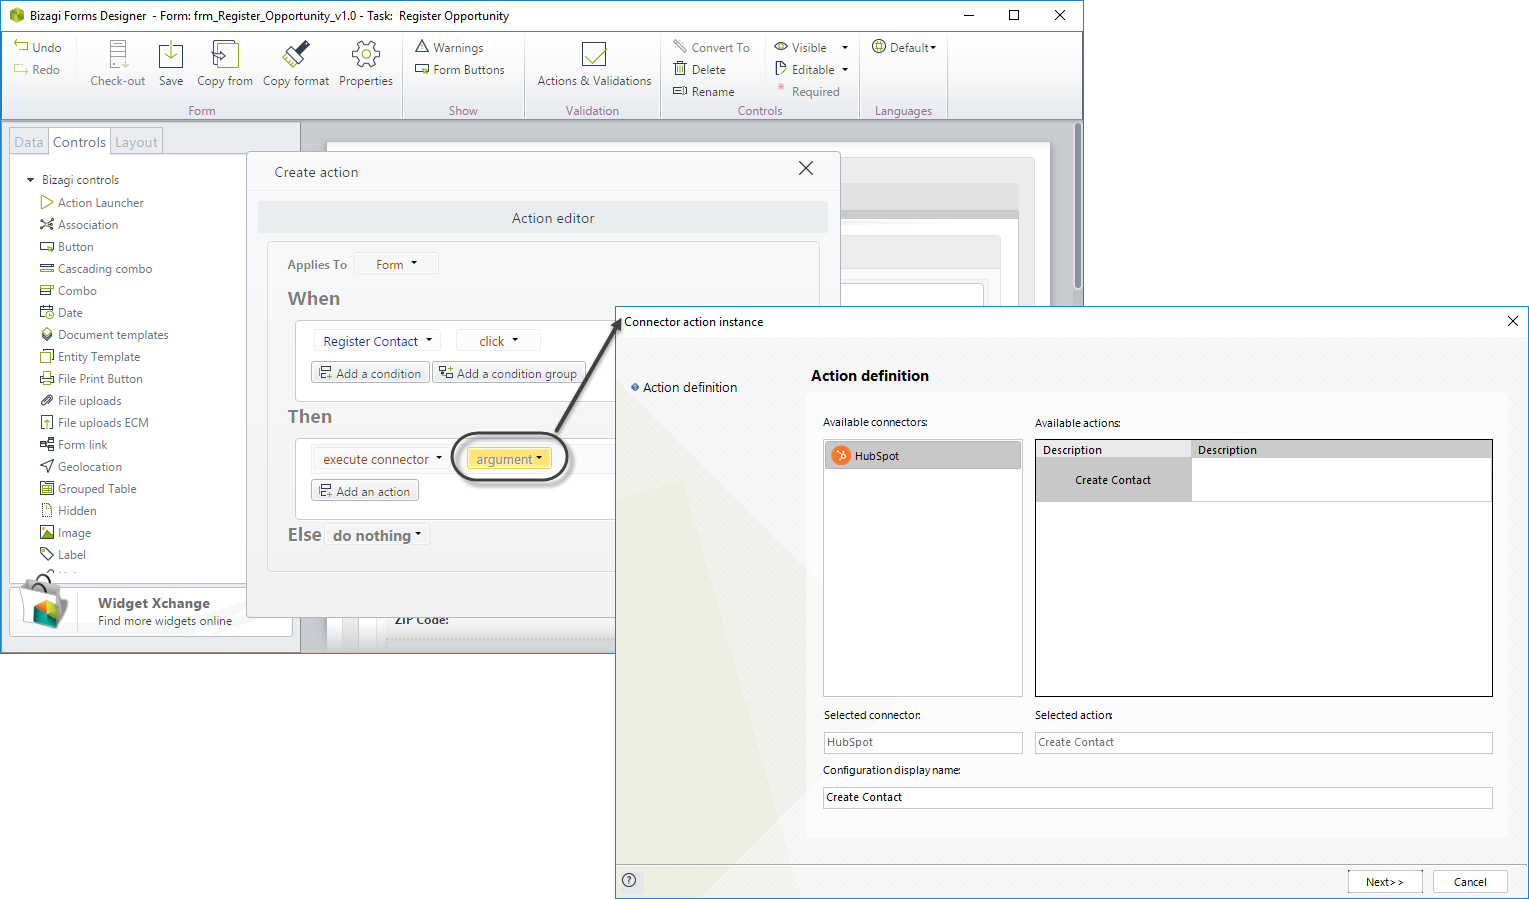
-
Update affected controls
Click Add an action and define the controls that have to be updated after executing the connector. To do so, use the Refresh command.
In this case, the control to refresh is HubSpot Id.
Refresh HubSpot Id.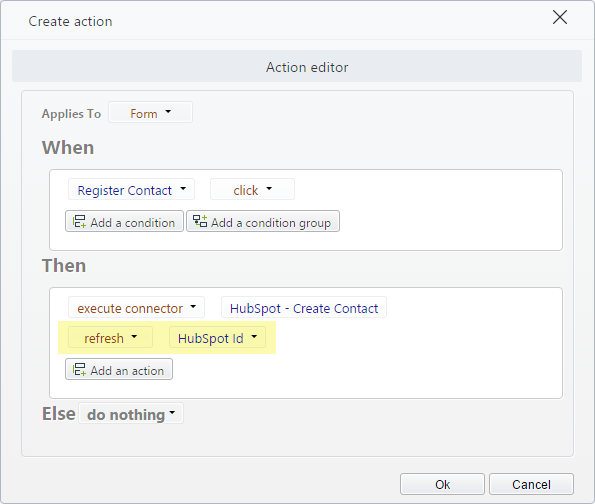
-
Define the Else Action
In this case, no action will execute when the condition is NOT met, so select the option Do nothing.
From the Work Portal, when the user clicks the button, the connector will be executed.
Clear the data for a control
By using actions, you can also clear the data for a specific control when a condition is met.
Example
In a Claims and complaints handling process, the information of a case is entered in the first activity. In some cases, when most of the information has been filled, the customer can decide to decline the case. In this situation, it is desirable that the user entering the information can delete the information previously entered just with one click.
-
Include the button in the form
Drag and drop a button control from the Controls panel. Name it Clear information.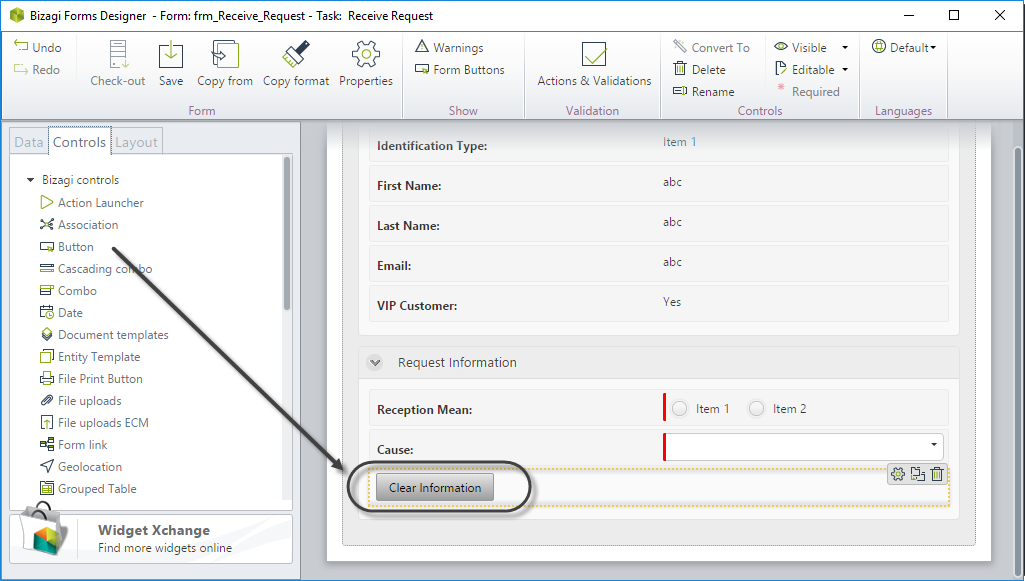
-
Create the Action
Select Actions & Validations and add a new Action. -
Include the condition
Click Add a condition and select the control, operator, and argument as follows:
When Clear Information click.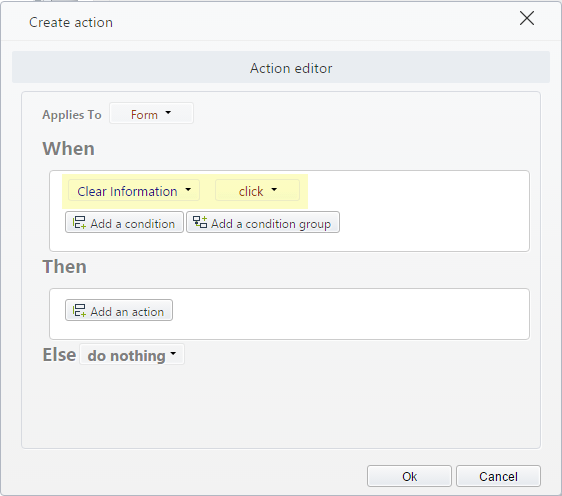
-
Include the Action (Then)
Click Add an action and define what will happen when the condition above is met:
Clear data for Customer, Reception mean, and Cause.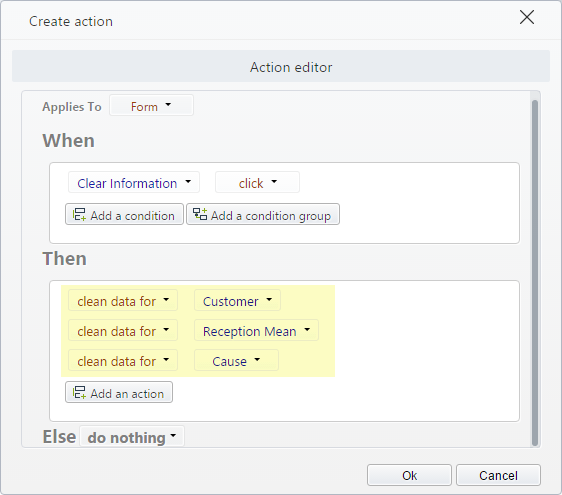
-
Define the Else Action
In this case, no action will execute when the condition is NOT met, so select the option Do nothing.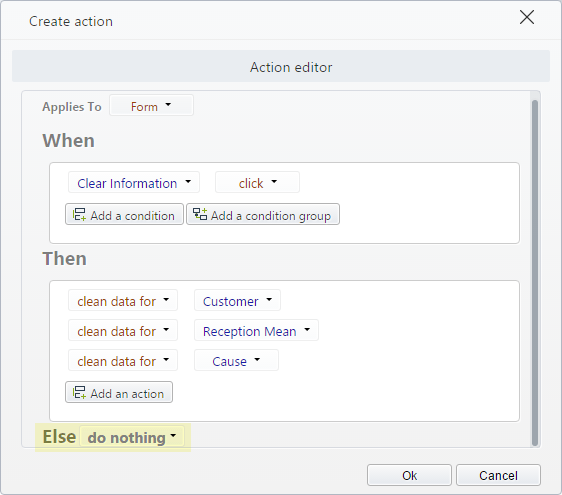
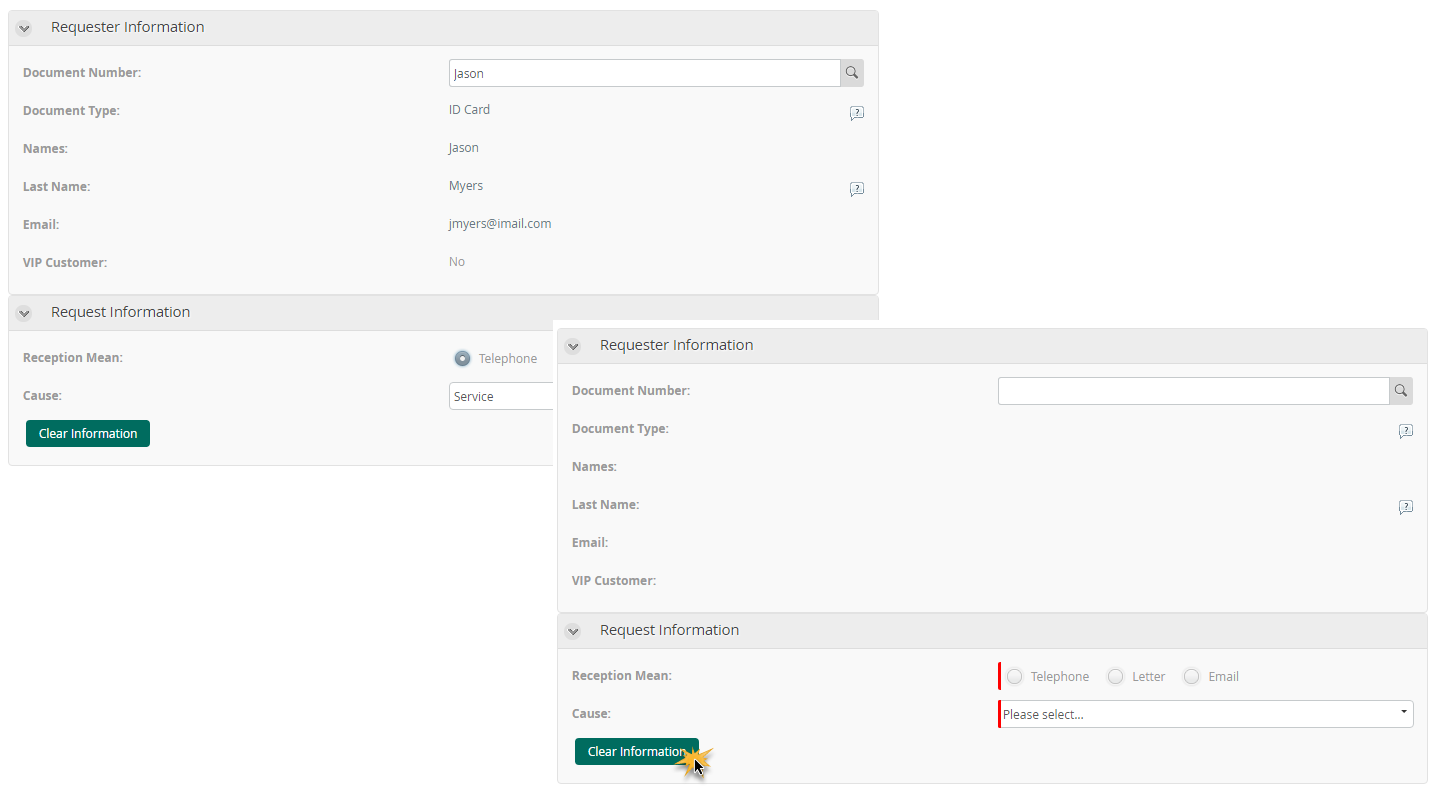
This is how the Work Portal will look like according to the end user's choice:
Collapse a group
You can manipulate groups using actions to expand or collapse them according to specific conditions.
Example
In a Travel Request Process, the information of hotel booking is displayed in an independent group. This group should only be expanded if the requester requires hotel booking; otherwise, it should remain collapsed.
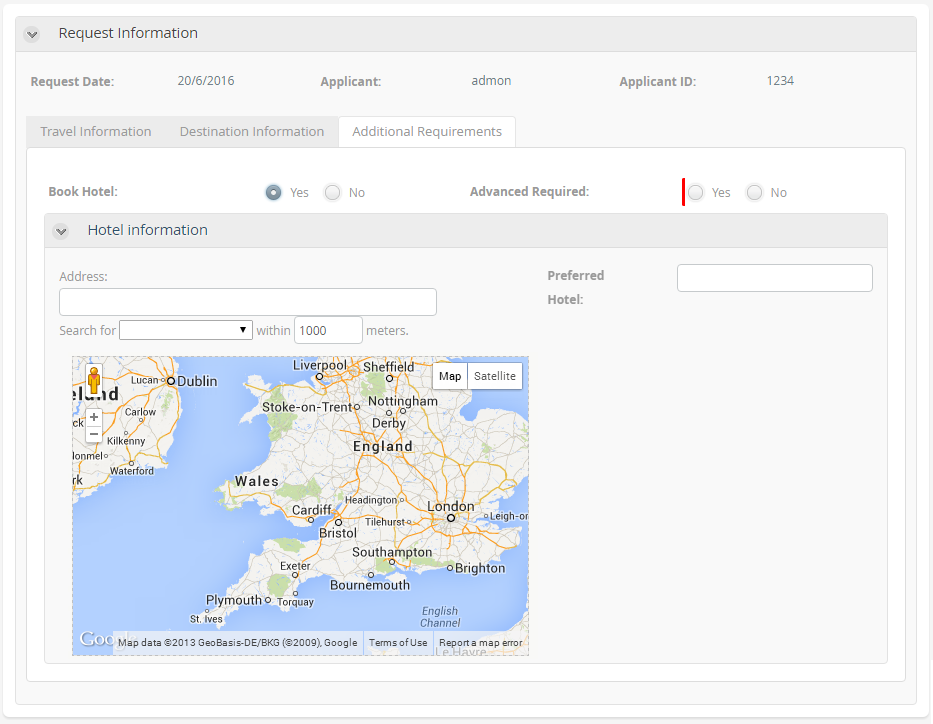
To collapse or expand the hotel information group according to the requirement:
-
Create the Action
On the Forms designer, select Actions & Validations and add a new Action. -
Include the condition
Click Add a condition and select the control, operator, and argument as follows:
When Book hotel is false.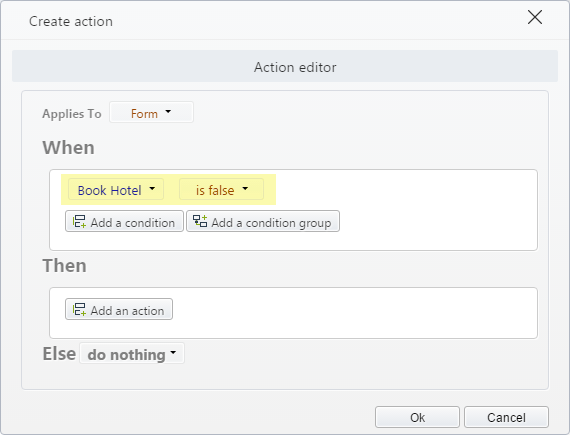
-
Include the Action (Then)
Click Add an action and define what will happen when the condition above is met:
Collapse Hotel Information to true.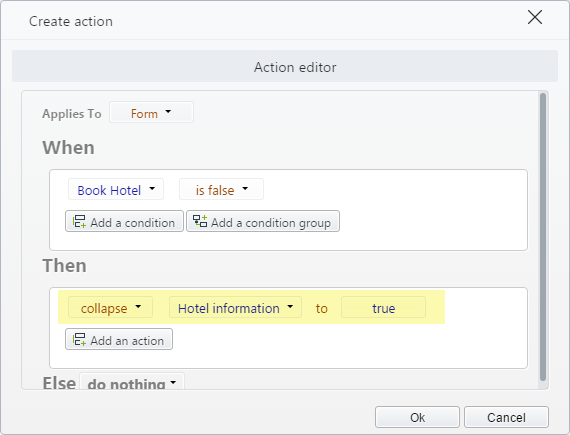
-
Define the Else Action
This action will execute when the condition is NOT met:
Collapse Hotel Information to false.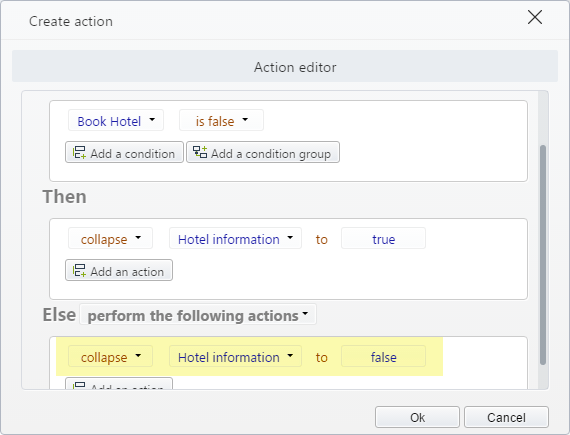
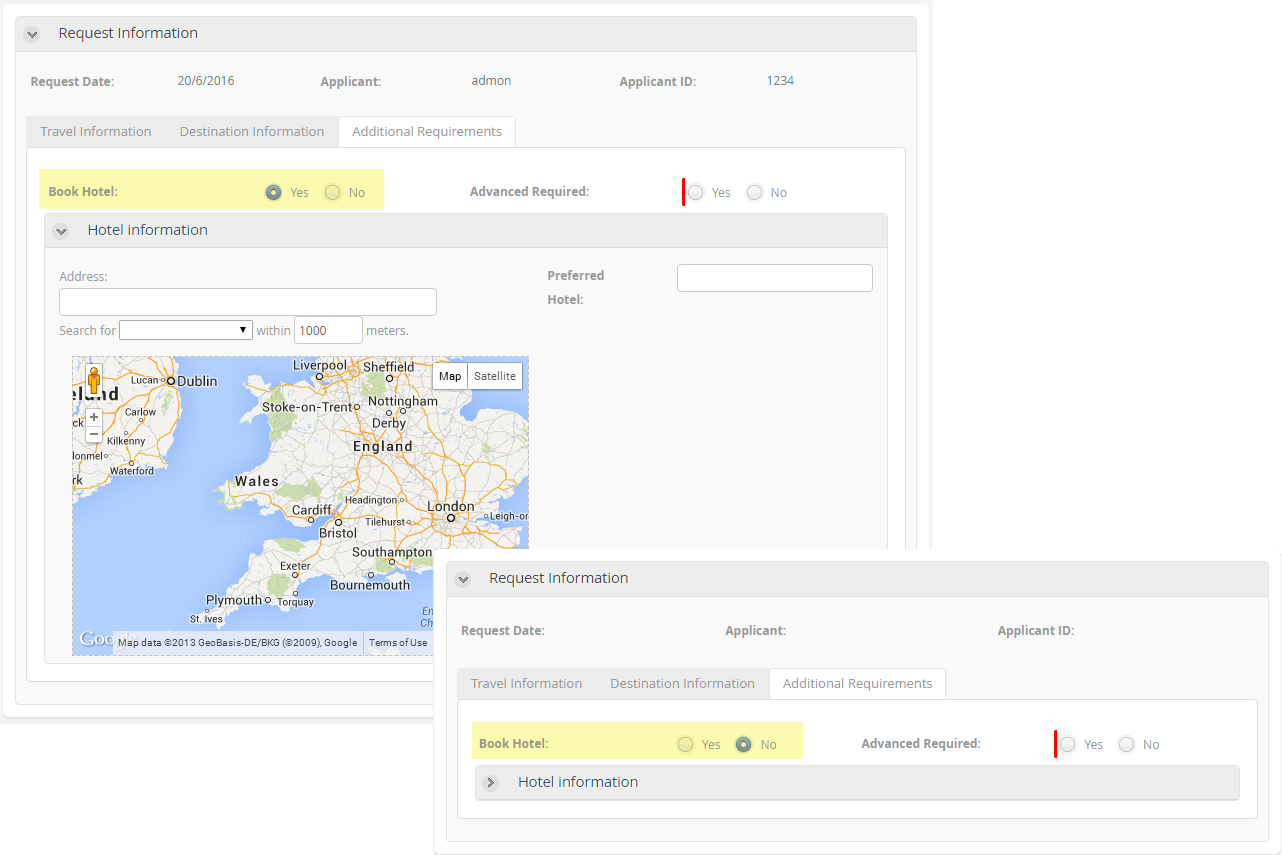
This is how the Work Portal will look like according to the end user's choice:
Perform an action when a record of a collection is deleted
Actions can be performed when the record of a collection is deleted.
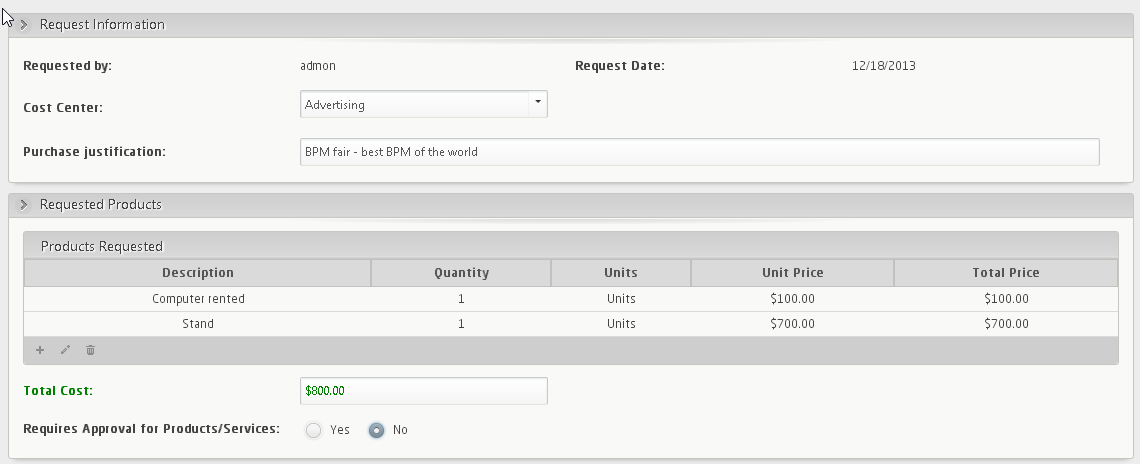
Example
In a Purchase request, the Total value of the purchase is calculated with each product included in a table. If the Total value is greater than $1,000, the Total control must turn red. Otherwise, the control must turn green. Since products can be deleted from the table, the Total control must be refreshed to reflect the total amount.
-
Create the Action
On the Forms designer, select Actions & Validations and add a new Action. -
Include the condition
Click Add a condition and select the Table control, operator, and argument as follows:
When Products requested has a row deleted.
Execute rule (that calculates the Total Cost estimate).
Refresh Total Cost.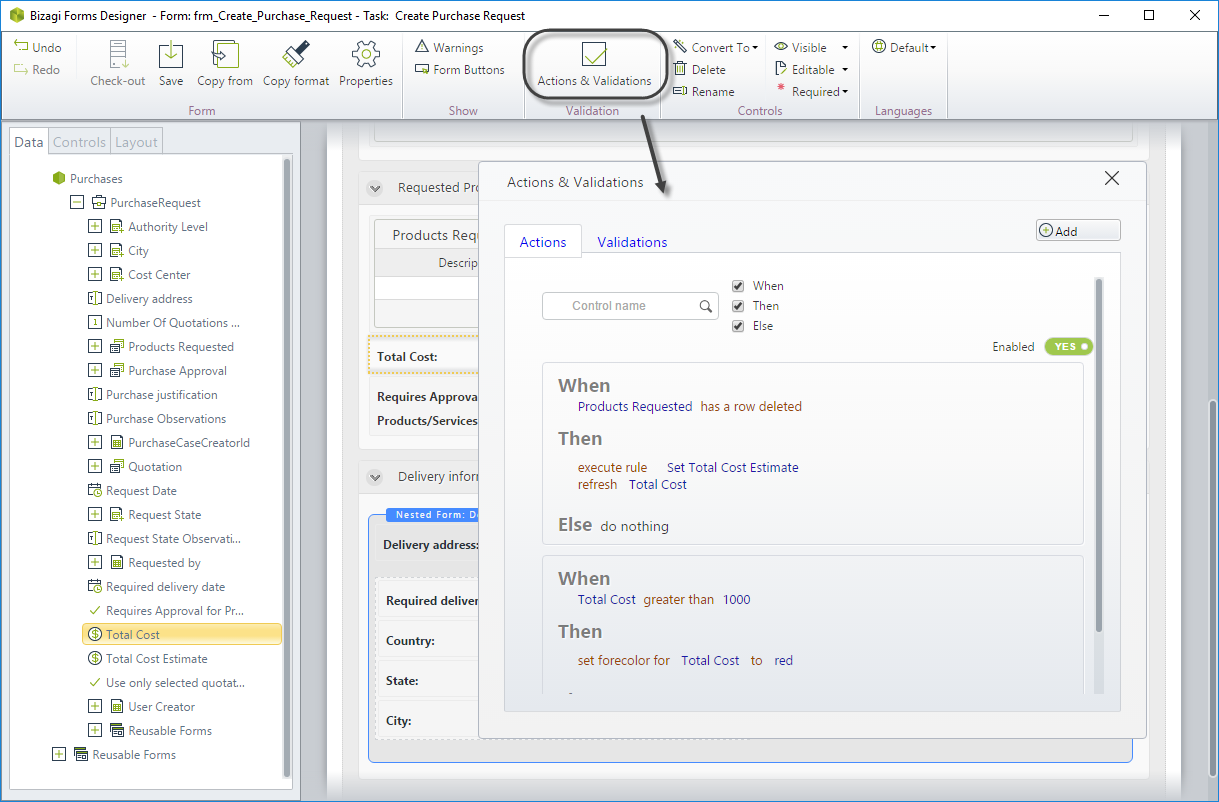
-
Define the Else Action
In this case, no action will execute when the condition is NOT met, so select the option Do nothing.
-
In the Work Portal, fill the table of products until the Total cost turns red.
-
Select one row for deletion.
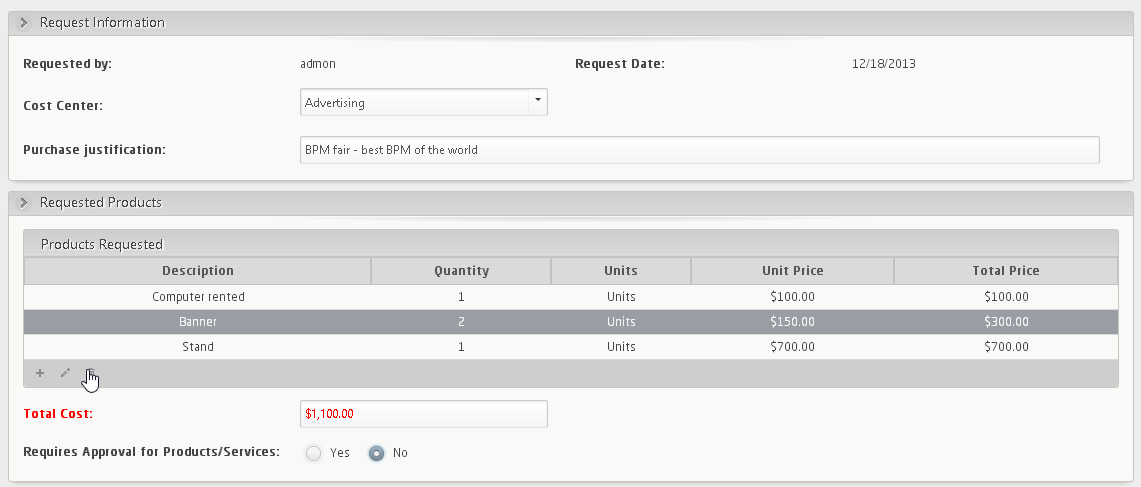
-
See how the Total cost is refreshed as soon as the row is deleted.
Perform actions over form buttons
You can perform Actions over Form buttons to:
- Set forecolor
- Set background
- Change editability and visibility
- Click on the Form buttons
Example 1: Changing Editability and Background of the form buttons
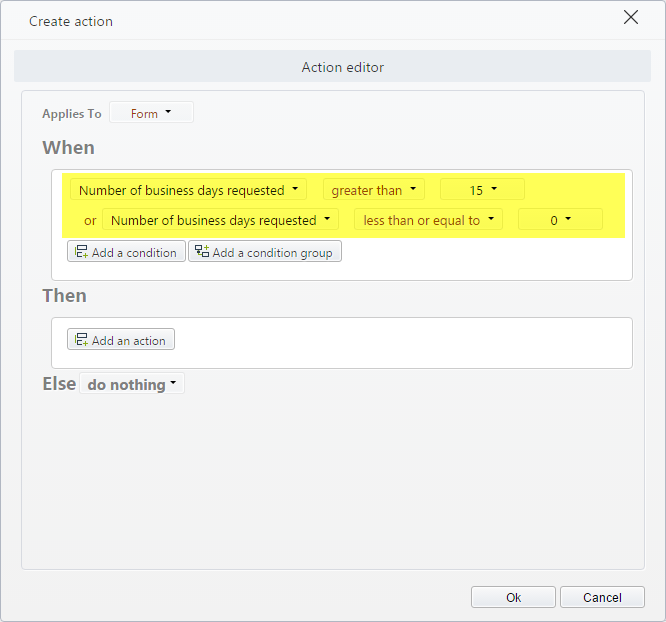
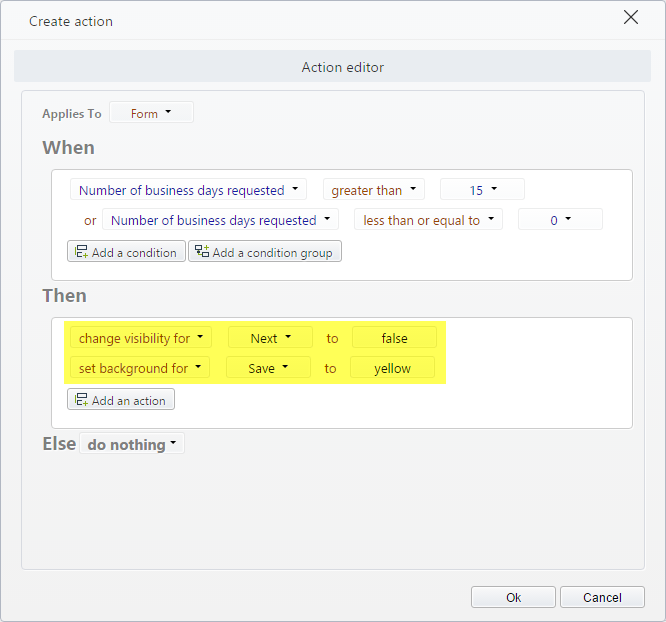
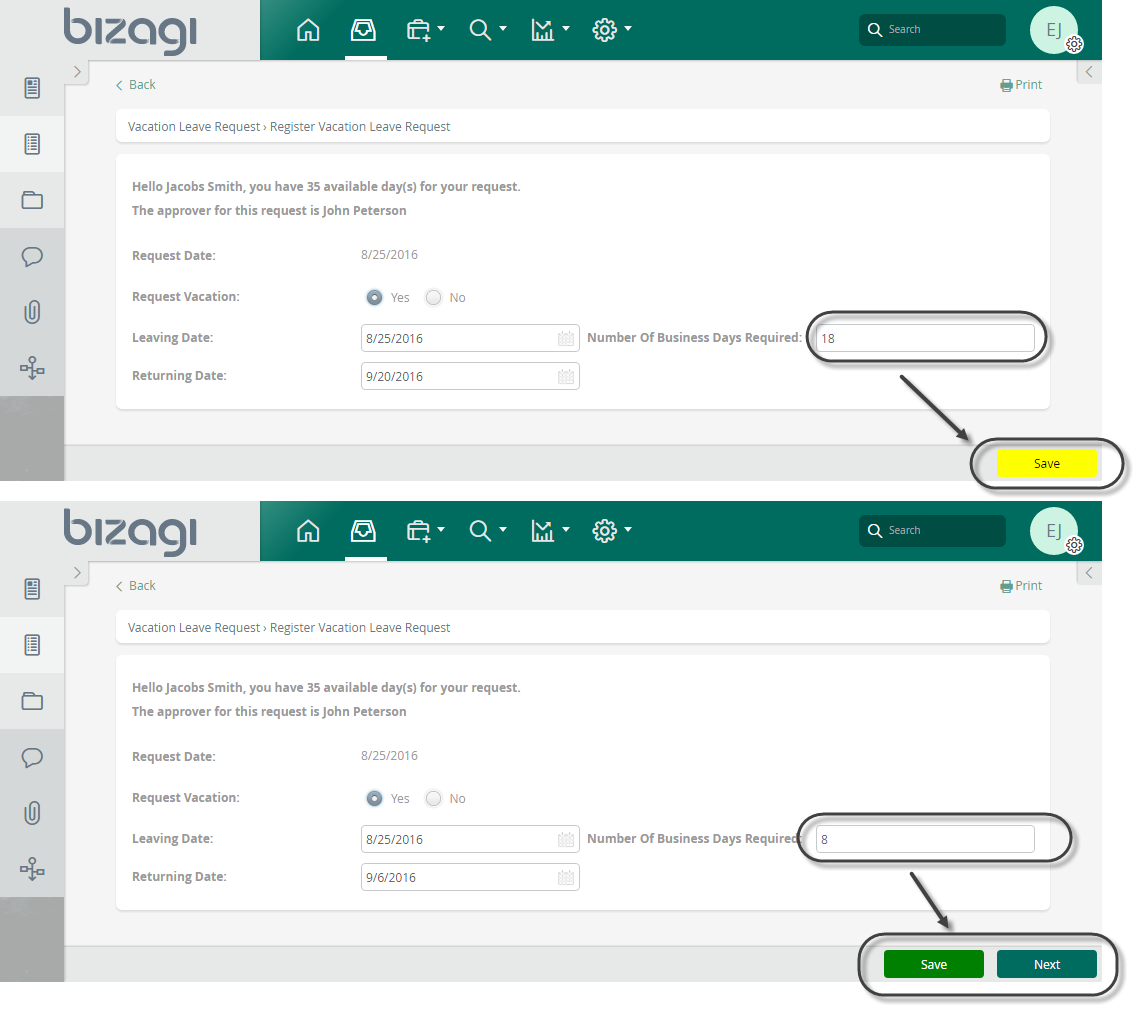
In a Vacation Request process, the requester user cannot complete a Task and thus move on in the workflow if he/she is requesting more than 15 business days or less than one day. If the user sets a value greater than 15 or equal to zero in the Number of business days requested field, the Next button has to be hidden, and the Save button has to change its background color to yellow. To achieve this, follow the instructions below.
-
Enable Form Buttons in the Ribbon
A new panel will display at the bottom of the form. For more information about these buttons, refer to Form buttons.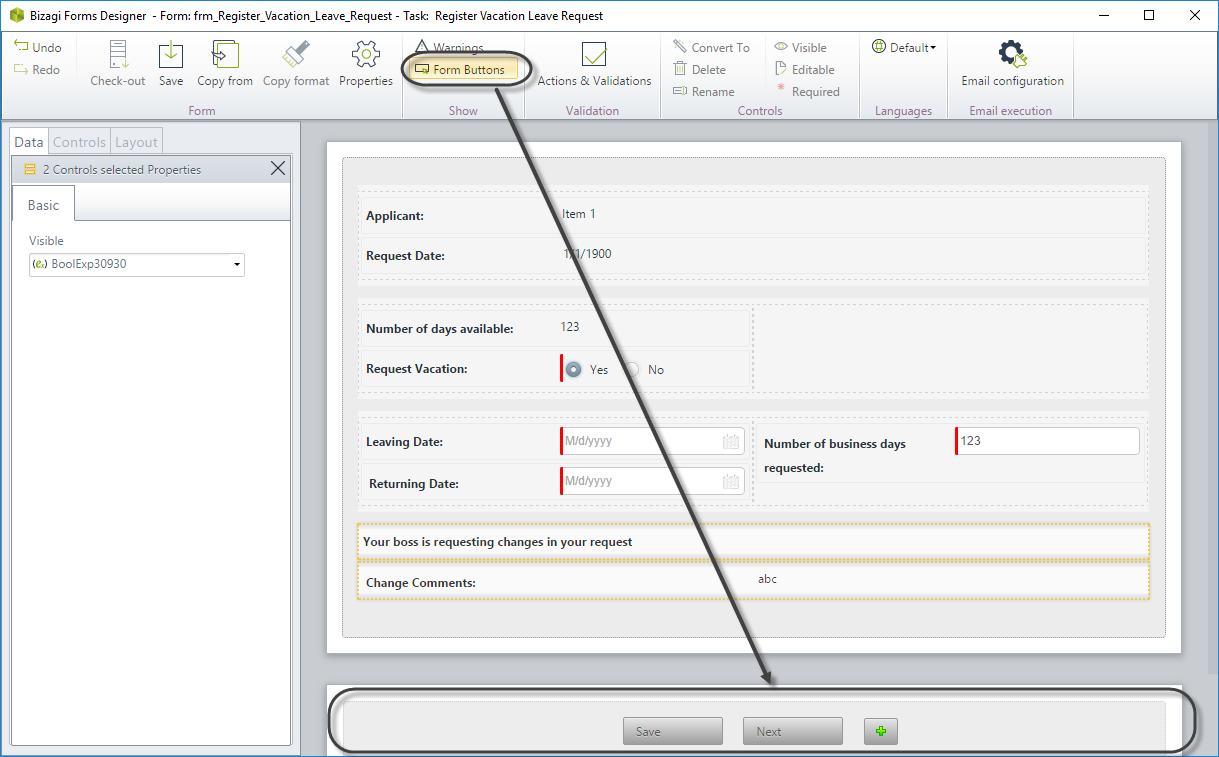
-
The two default buttons will display and be available in Actions and Validations.
Create the Action: On the Forms designer, select Actions & Validations and add a new Action. -
Include the condition
Click Add a condition and select the Number of business days requested control, operator, and argument as follows:- Number of business days requested greater than 15
- Number of business days requested less than or equal to 0
-
Include the Action (Then)
Click Add an action and define what will happen when the condition above is met:- Change visibility for Next to false
- Set background for Save to yellow
-
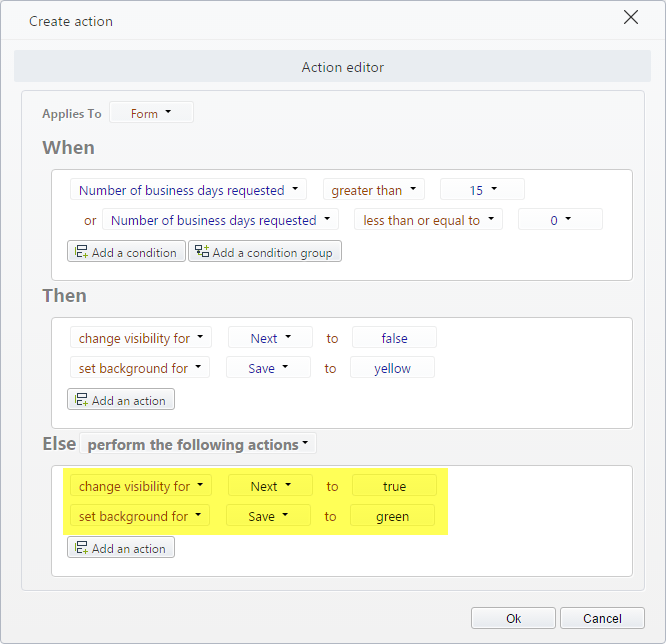
Define the Else Action
In this case, the action will display the Next button and change the Save button's background to Green (default) color. Select the perform the following actions options and select the described condition:- Change visibility for Next to true
- Set background for Save to green
This is how the Work Portal will look like according to the end user's choice:
Example 2: Clicking on Form buttons
In a Vehicle Insurance Policy Underwriting process, the company has defined for the Register Client and Vehicle Data task some checkpoints where it is necessary to perform an auto save. To do so, when the value of the fields defined as a checkpoint changes, the Save button has to be clicked automatically. To achieve this, follow the instructions below.
-
Enable Form Buttons in the Ribbon
A new panel will display at the bottom of the form. For more information about these buttons, refer to Form buttons.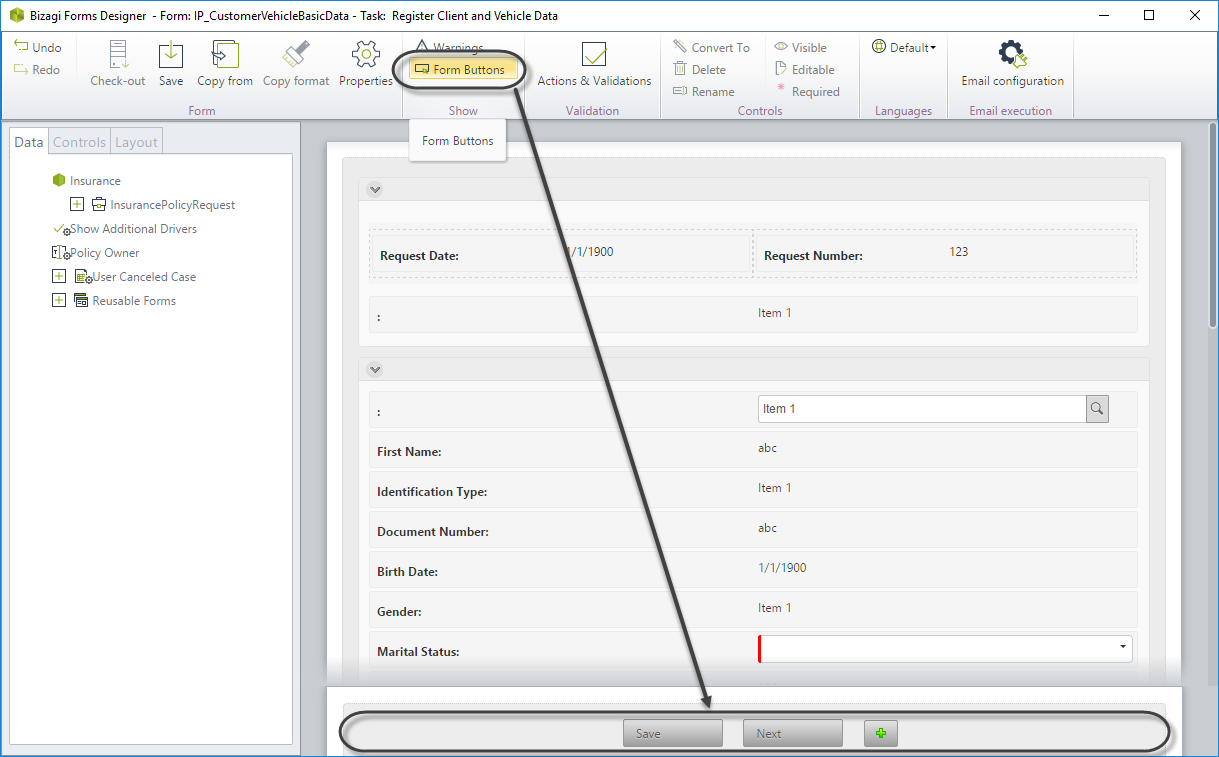
-
The two default buttons will display as available in Actions and Validations.
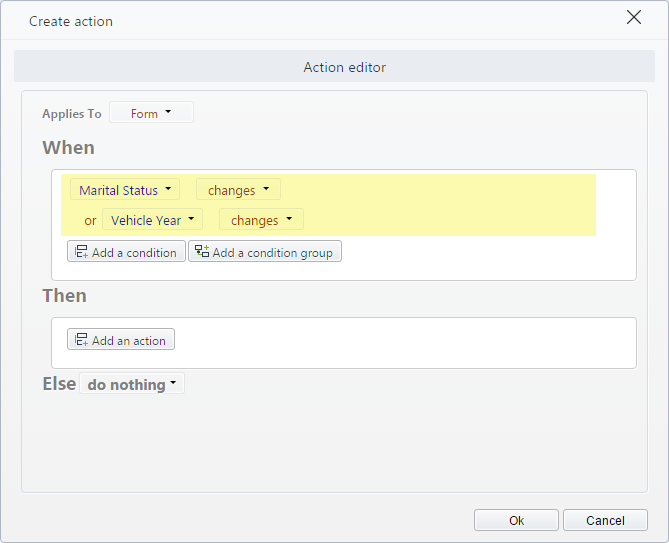
Create the Action: On the Forms designer, select Actions & Validations and add a new Action. -
Include the condition
Click Add a condition and select the controls defined as checkpoints, in this case, the controls are Marital Status, and Vehicle Year. Operator and argument as follows:- Marital Status changes
- Vehicle Year changes
-
Include the Action (Then)
Click Add an action and define what will happen when the condition above is met:- Click on Save
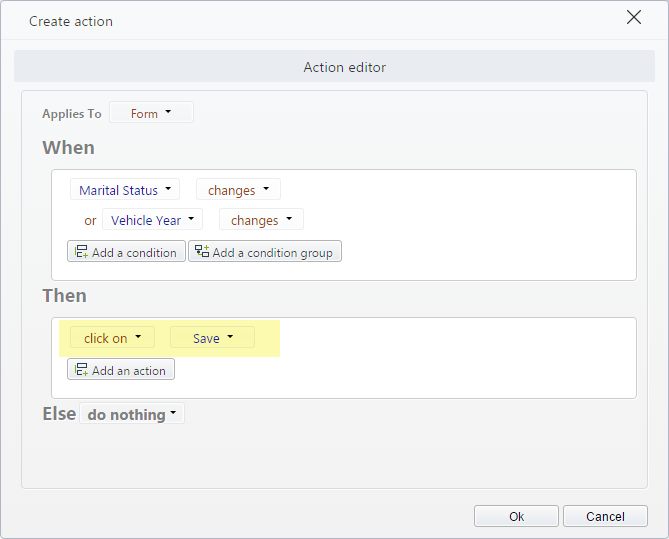
-
Define the Else Action
In this case, no action will execute when the condition is NOT met, so select the option Do nothing.
Now, when the user fills these fields, Bizagi Work Portal will auto-click the Save button, and the information in the form will be persisted.